Skip to content
  • There are no suggestions because the search field is empty.

Online Lead Capture Feature

Watch the video below for the tutorial:

00:00: Welcome to this quick guide on navigating the new online leads capture

00:04: dashboard and kilogram.

00:06: The online leads capture feature is the new and improved version of Online

00:10: requests. It allows practices to collect patient inquiries

00:14: and service requests through a public online form then manage and respond

00:19: to those submissions directly in kilogram.

00:22: In this video, I'll walk you through the step-by-step, workflow starting

00:26: with the patient's view from the public URL, then how to manage and customize

00:30: your online lead templates and finally, how to enable automatic

00:34: task creation for each lead submission.

00:36: If you do not have this feature enabled, contact your practice administrator or

00:40: your cure gram sales, account manager, or customer support to add this feature.

00:45: So let's get started access.

00:47: The online leads capture section within your kilogram app dashboard by

00:51: following these steps.

00:53: On the kilogram app dashboard navigate to the settings tab?

00:58: Next navigate to the online. Lead capture option, under the practice

01:02: settings.

01:03: This is your online lead capture dashboard.

01:07: Next, I'll walk you through how to navigate and set up the online leads

01:11: capture feature in kilogram.

01:14: This is the public URL. The public URL is the shareable

01:18: link to your online leads form, where patients can select a topic fill

01:22: out details and submit requests directly to your practice.

01:26: Next here, you can set the thank you message template.

01:30: This is the custom message patients will see after submitting the request through

01:34: the online leads capture form.

01:37: These lead capture name lists, the topics or inquiry types that patients can

01:41: choose from when submitting a request through the public URL.

01:45: Next, we have the messaging templates column.

01:48: These are the SMS responses. You can set up to automatically send after

01:52: patient submits their requests or inquiry from the public URL.

01:57: When you click the messaging template icon, you can edit both the initial response

02:01: and after hours messages, these are the automated SMS replies.

02:06: Patients will receive after they submit their request.

02:09: Following that autotask settings control.

02:12: Whether incoming requests are automatically assigned as tasks when a

02:16: patient submits, a requests from the public URL.

02:19: The small icon beside the toggle opens, the task settings.

02:24: This pop-up will appear once you toggle the auto task settings from here,

02:28: you can assign those tasks to a single or multiple person once.

02:32: A patient submits a request.

02:35: Public page settings are toggle switches that control whether a specific lead

02:39: capture name, such as billing prescription, refill, or scheduling new

02:43: patient appears on the public-facing online, lead capture URL.

02:48: Lastly here you'll find the delete and edit buttons.

02:52: Use these to remove or customize an existing lead capture name.

02:57: So how exactly can you create a captured lead name? Let's

03:01: walk through the steps.

03:03: Next click the plus plus symbol button in the top right corner to

03:07: create a new lead capture name.

03:10: Enter the template name then select the default topic.

03:14: Mapping and default Patient Group mapping.

03:17: Next, I'll show you the public URL from the patient's point of view.

03:22: This is what patients will see, when they access your public URL for online lead

03:26: capture.

03:28: From here. The patient can select a topic such as billing or prescription

03:32: refills. That comes directly from the online lead capture options, you

03:36: created and set in your online lead capture dashboard.

03:41: Here, the patient can enter their information including name date

03:45: of birth phone number and a brief description of their request.

03:50: To verify identity. An OTP will be sent to the mobile number

03:54: entered in the form by the patient. Once the code is entered, the

03:58: request is successfully submitted

04:01: That's it, you've successfully learned how online lead capture works,

04:05: and explored all its features. If you have any questions contact

04:09: us at support at caregame, we're always happy to help.


A. Step-by-step Instructions

 
Welcome to this quick guide on navigating the new online lead capture dashboard in Curogram.

1. Overview of Online Lead Capture Feature

The online leads capture feature is the new and improved version of Online requests. It allows practices to collect patient inquiries and service requests through a public online form then manage and auto-assign task those submissions directly in Curogram.

Introduction

2. What This Guide Covers

In this video, I'll walk you through the step-by-step, workflow starting with the patient's view from the public URL, then how to manage and customize your online lead templates and finally, how to enable automatic task creation for each lead submission.

Note: If you do not have this feature enabled, contact your Curogram sales account manager, or customer support to add this feature.

Introduction
3. Accessing the Online Lead Capture Section

So let's get started access. The online leads capture section within your Curogram app dashboard by following these steps.

Introduction

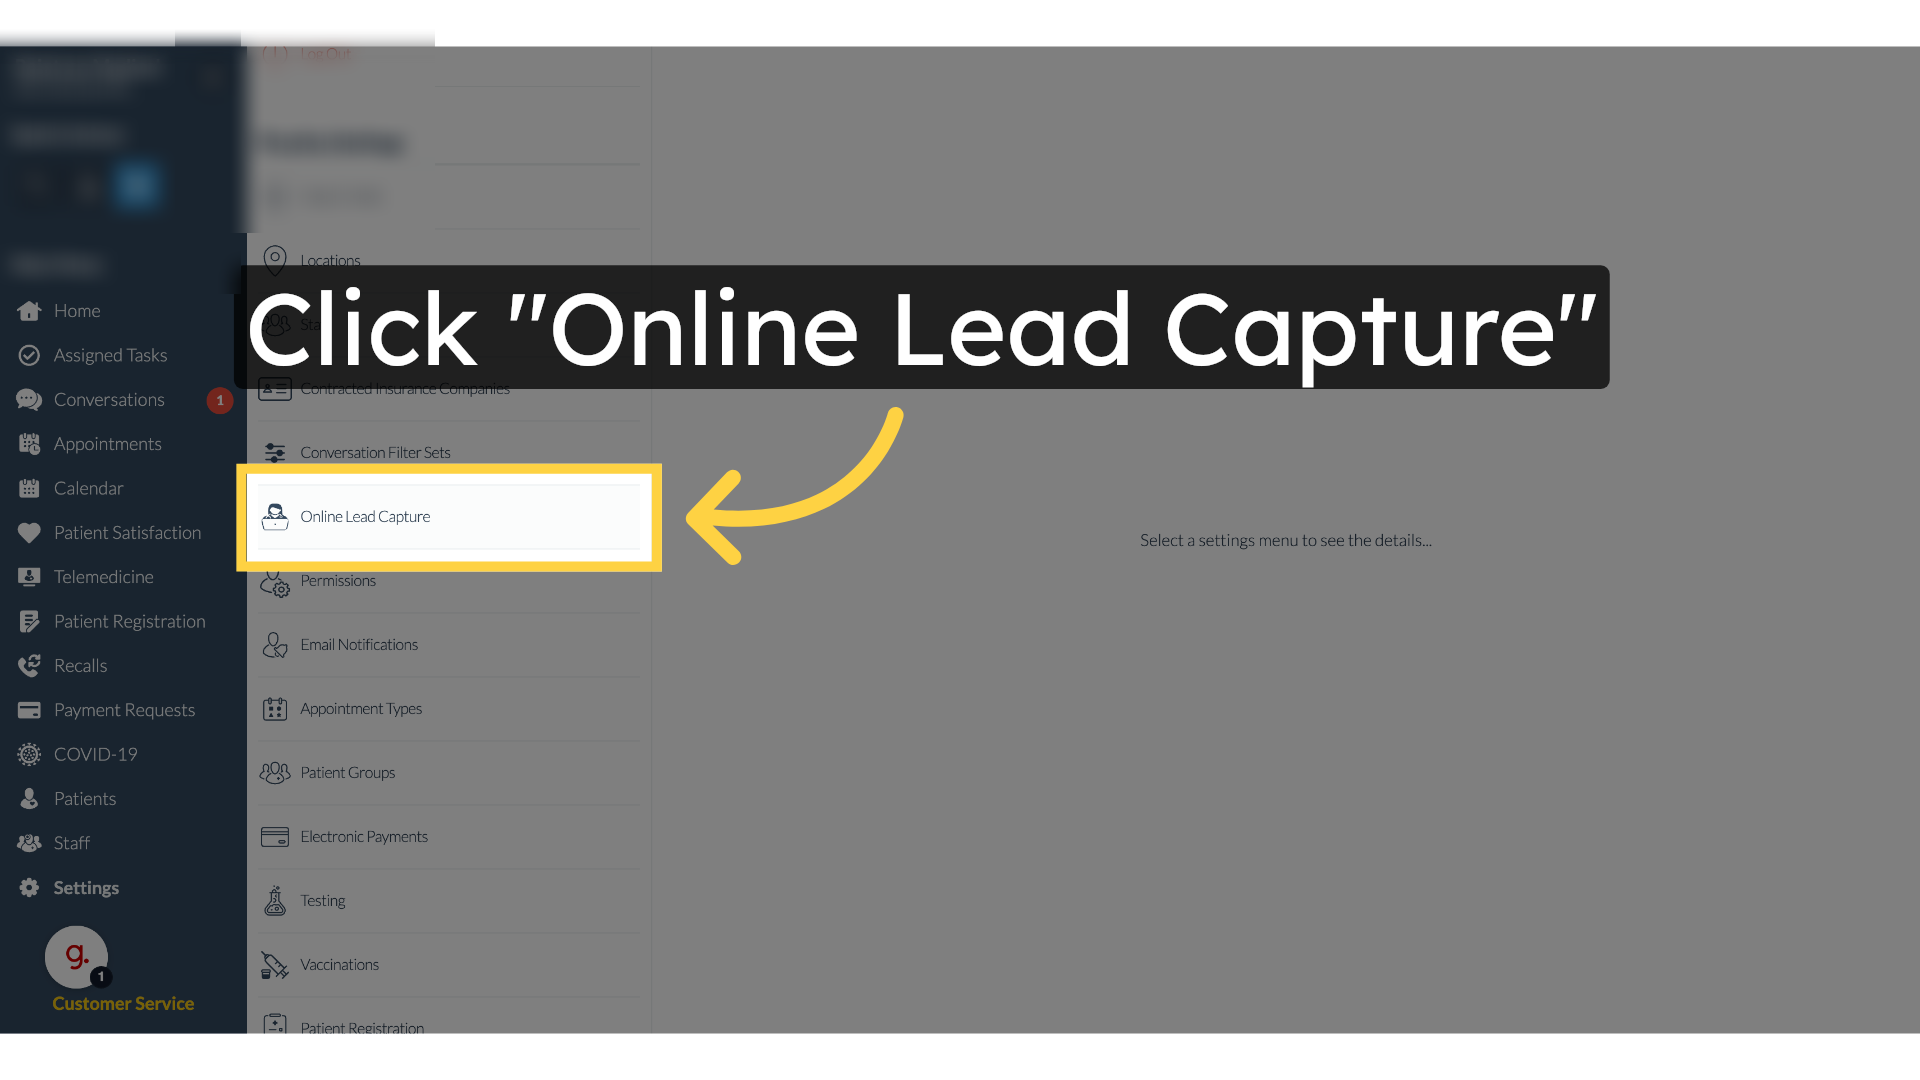
4. Navigating to Settings

On the Curogram app dashboard, navigate to the settings tab.

5. Opening Online Lead Capture Settings

Next, navigate to the OnlineLead capture option, under the practice settings.

Click 'Settings'

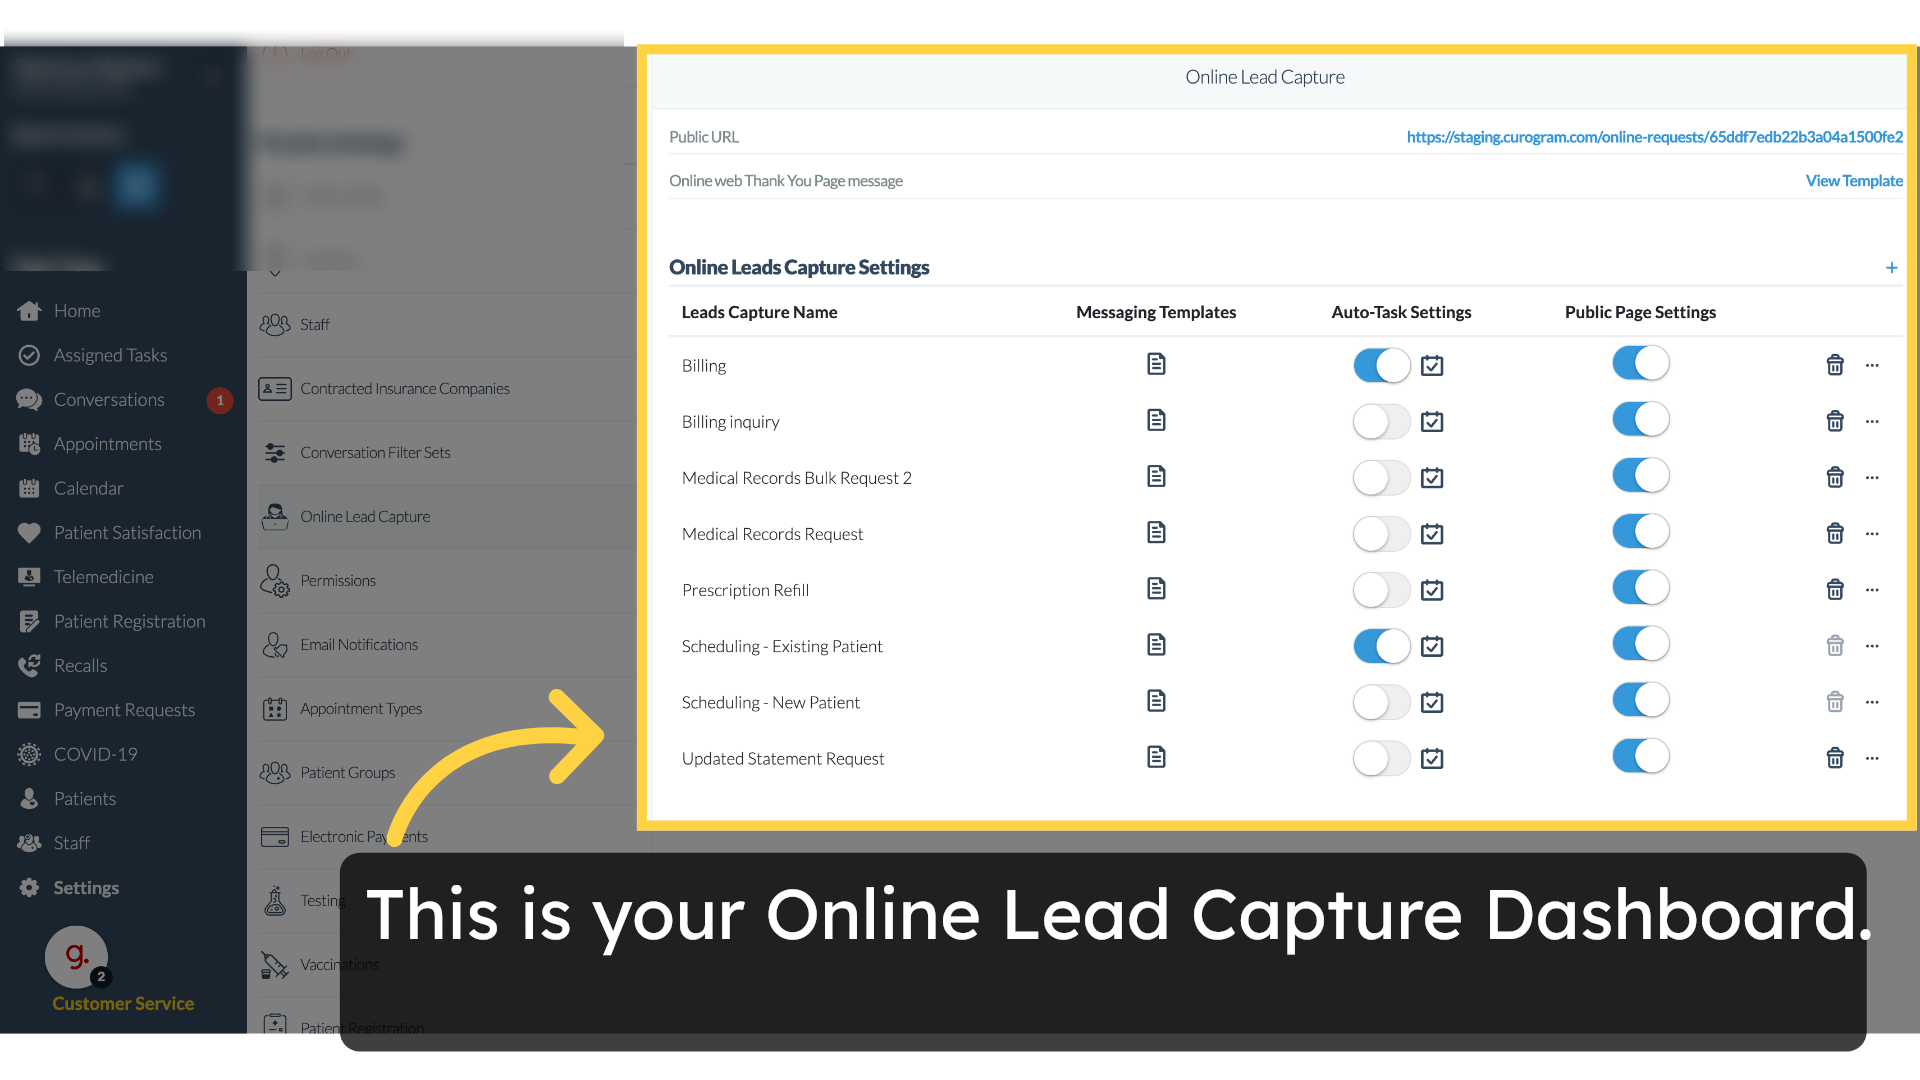
6. Viewing the Online Lead Capture Dashboard

This is your online lead capture dashboard.

Click 'View Template'

7. Exploring the Online Leads Capture Setup

Next, I'll walk you through how to navigate and set up the online leads capture feature in Curogram.

Click 'Online Leads Capture Settings'

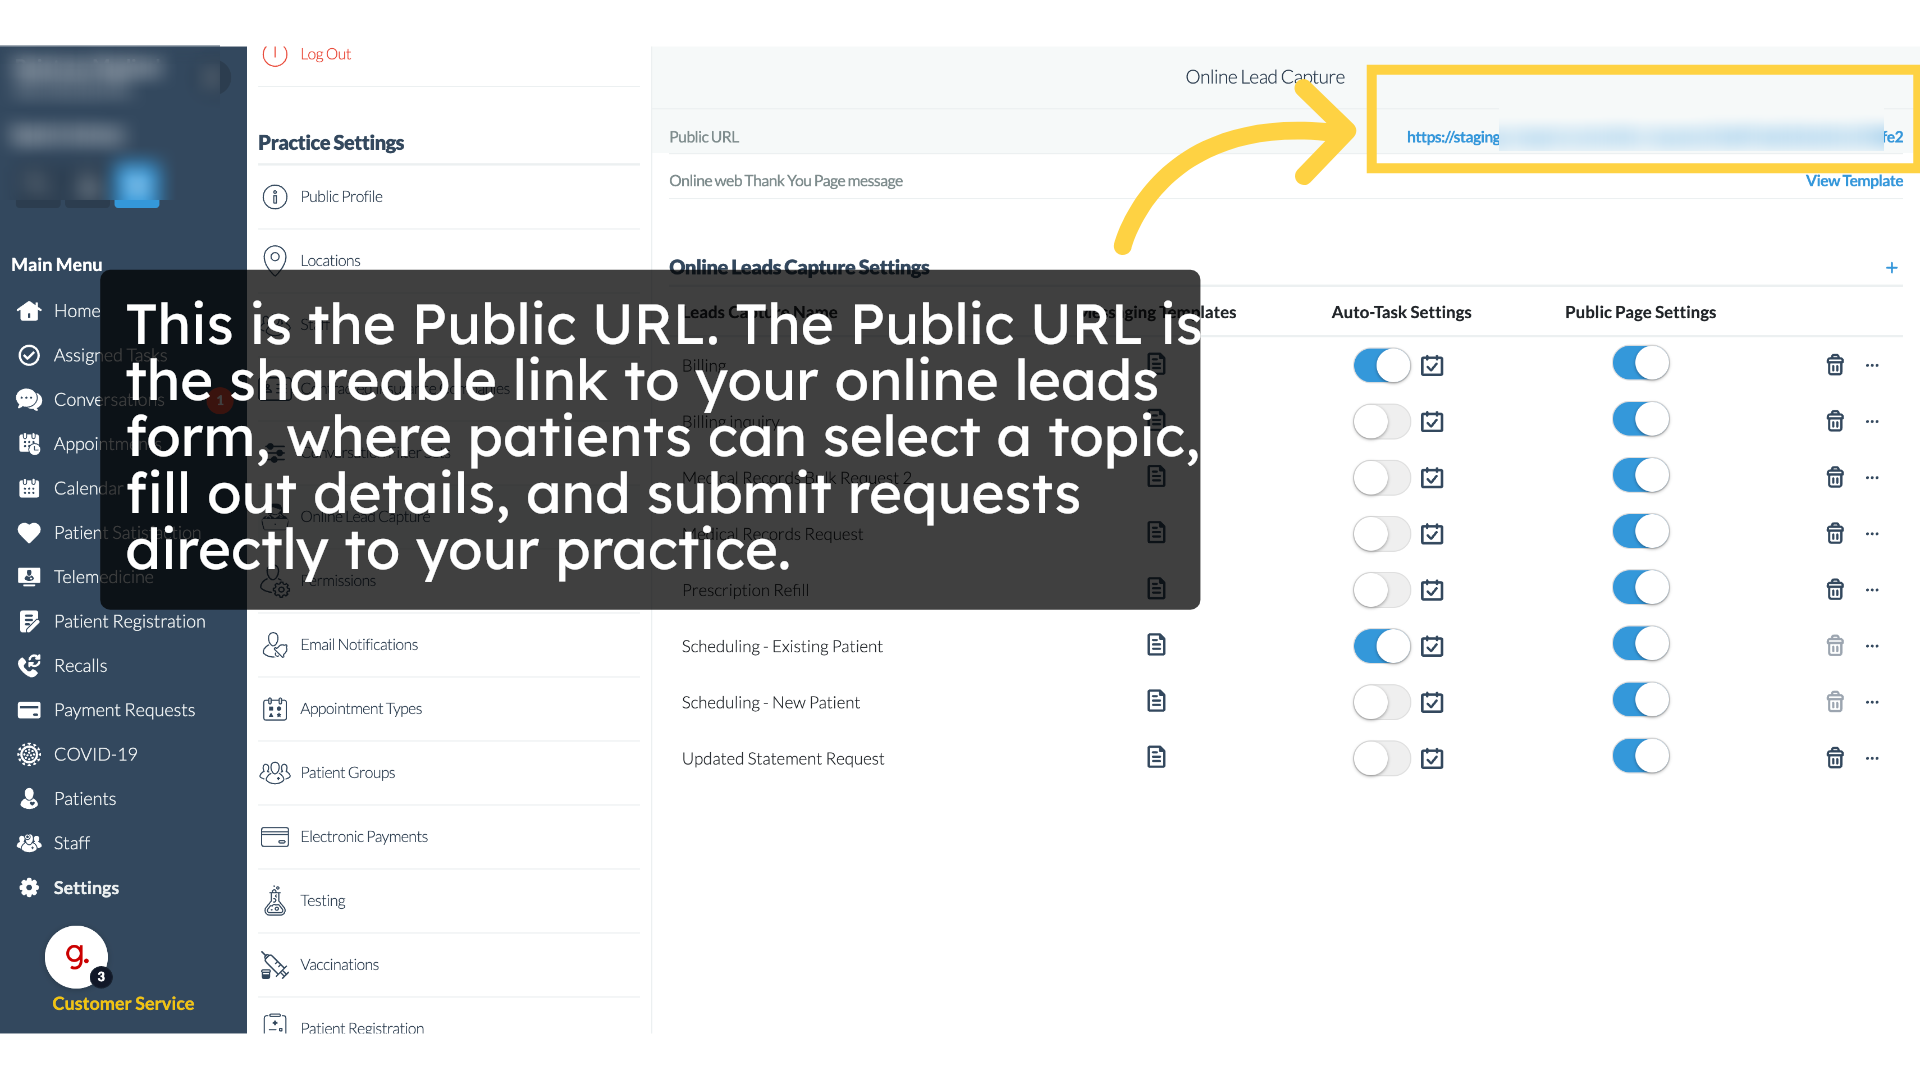
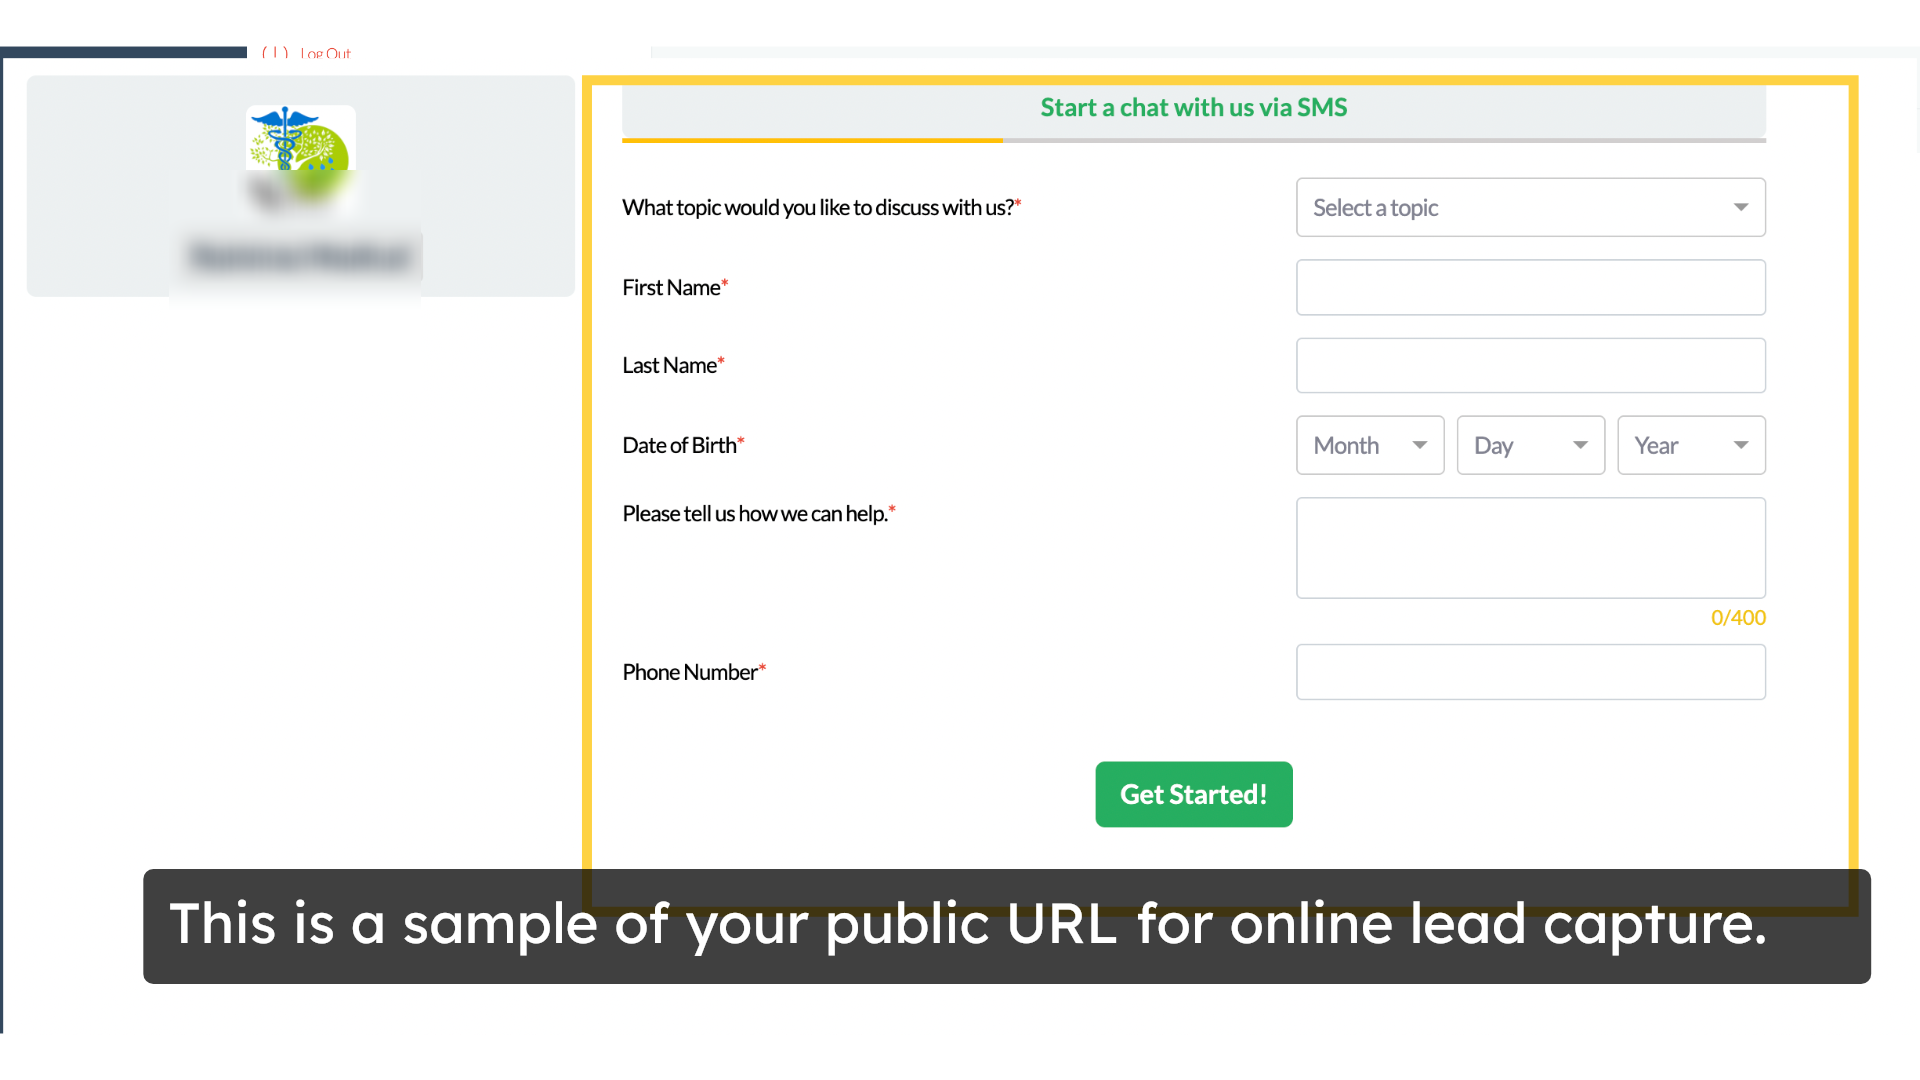
8. Understanding the Public URL

This is the public URL. The public URL is the shareable link to your online leads form, where patients can select a topic fill out details and submit requests directly to your practice.

Click 'Public URL https://staging.curogram.com/online-requests/65ddf7edb22b3a04a1500fe2'

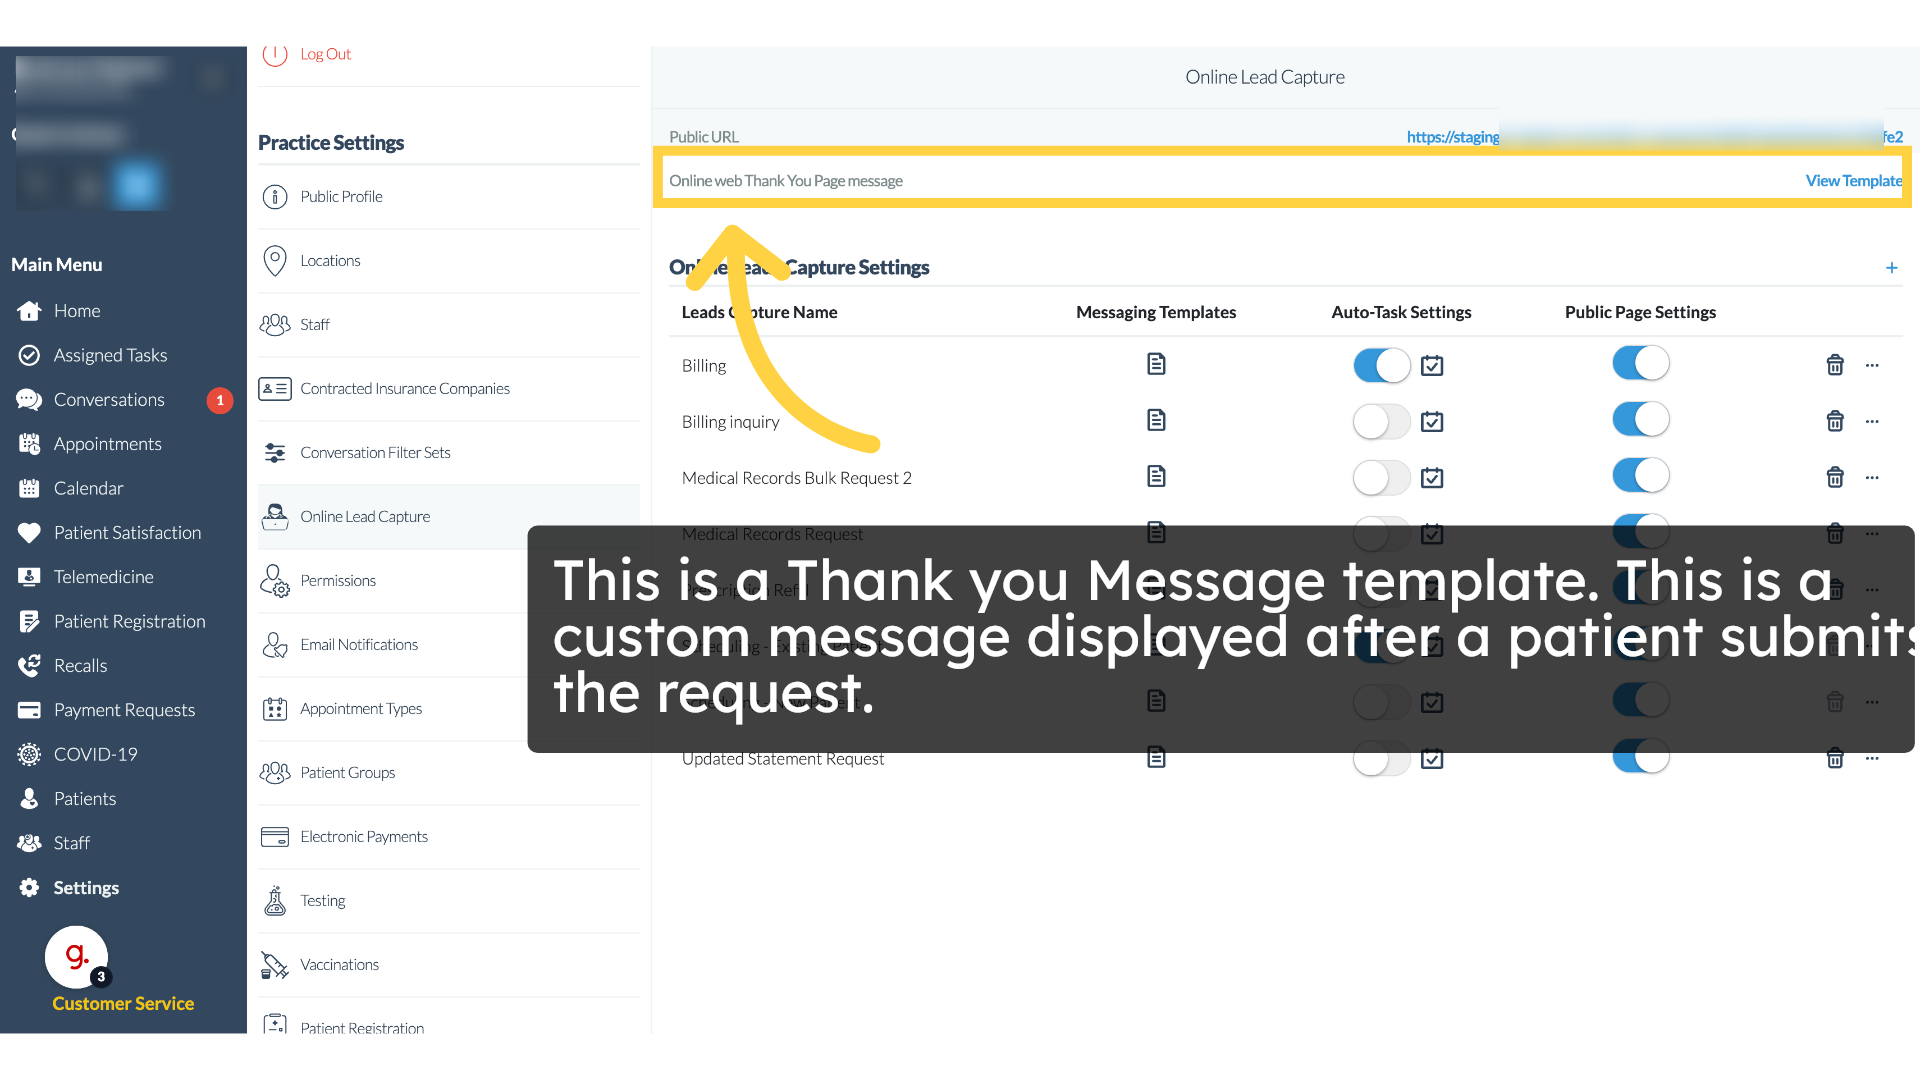
9. Setting the Thank You Message

Next here, you can set the thank you message template. This is the custom message patients will see after submitting the request through the online leads capture form.

Click 'Public URL https://staging.curogram.com/online-requests/65ddf7edb22b3a04a1500fe2'

10. Viewing Lead Capture Name List

These lead capture name lists, the topics or inquiry types that patients can choose from when submitting a request through the public URL.

Click 'Public URL https://staging.curogram.com/online-requests/65ddf7edb22b3a04a1500fe2'

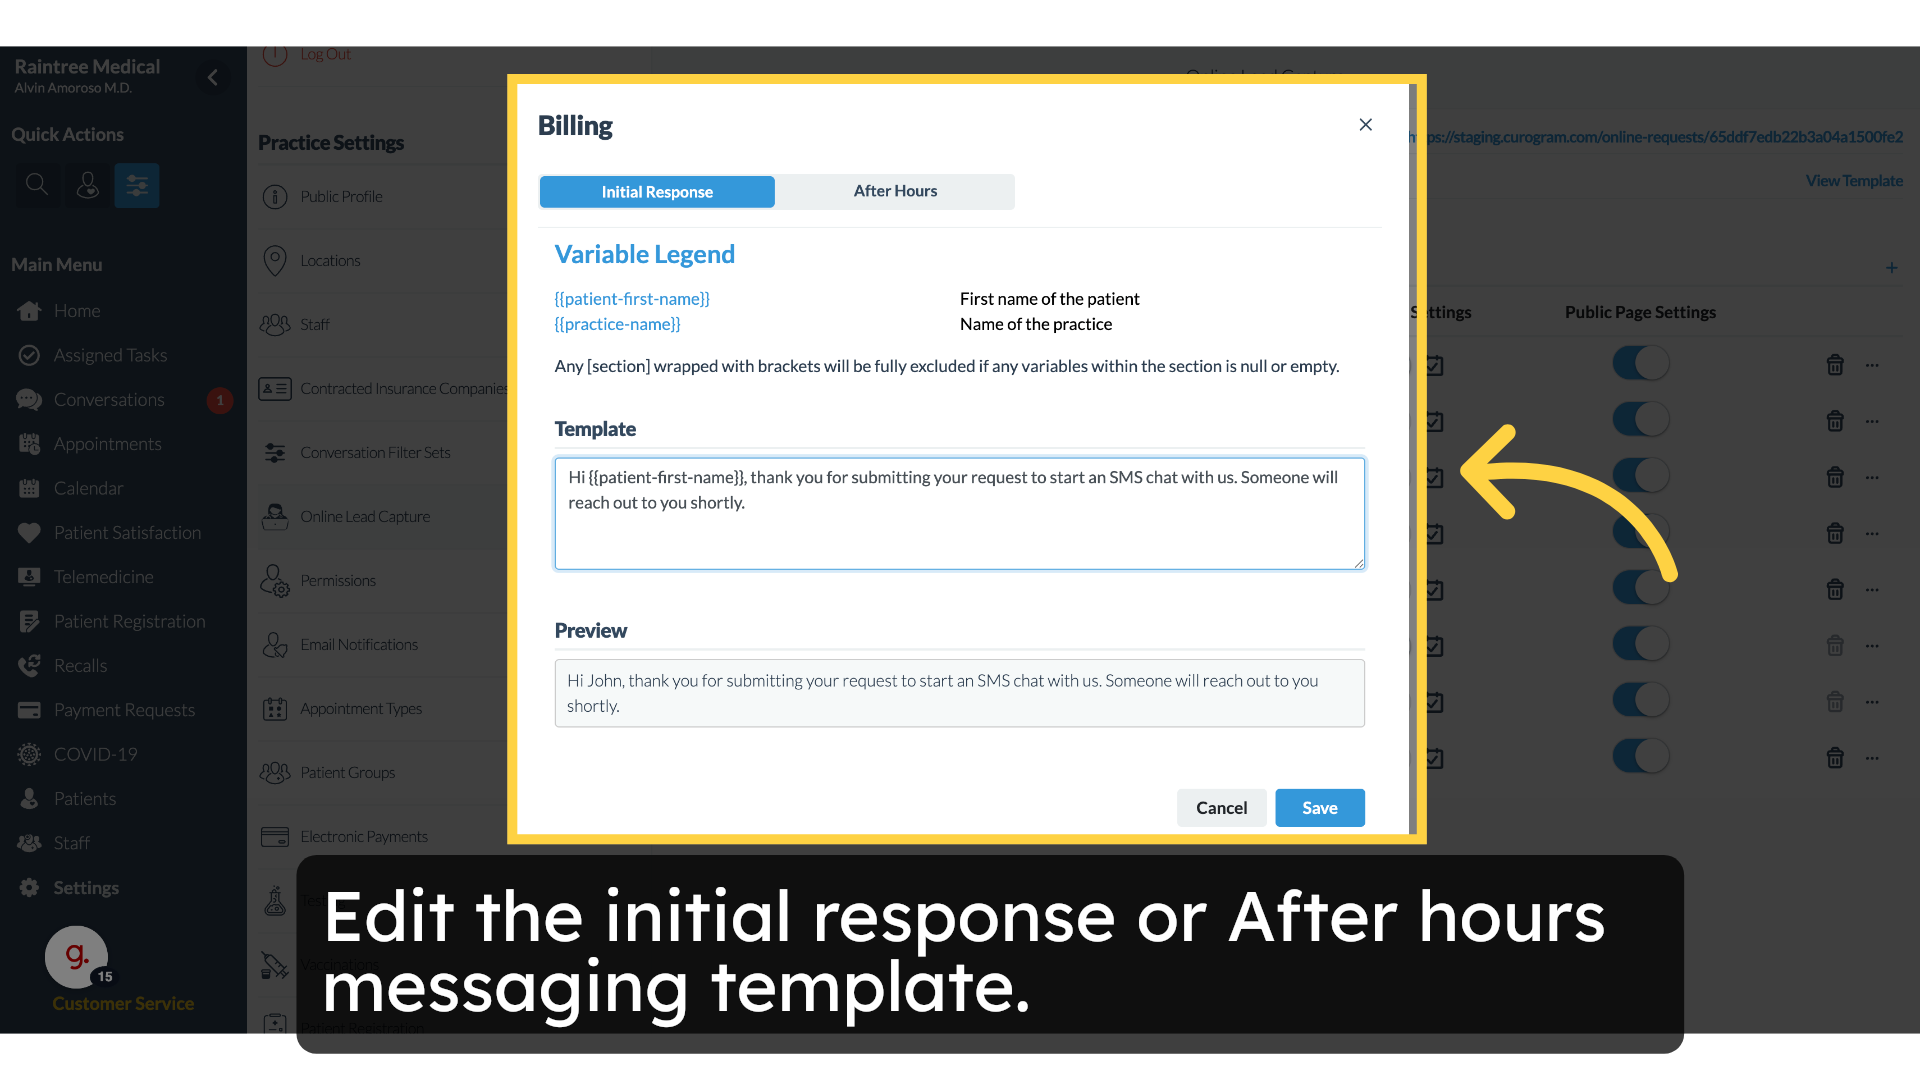
11. Editing Initial and After-Hours Responses

When you click the messaging template icon, you can edit both the initial response and after hours messages, these are the automated SMS replies patients will receive after they submit their request.

Click 'Public URL https://staging.curogram.com/online-requests/65ddf7edb22b3a04a1500fe2'

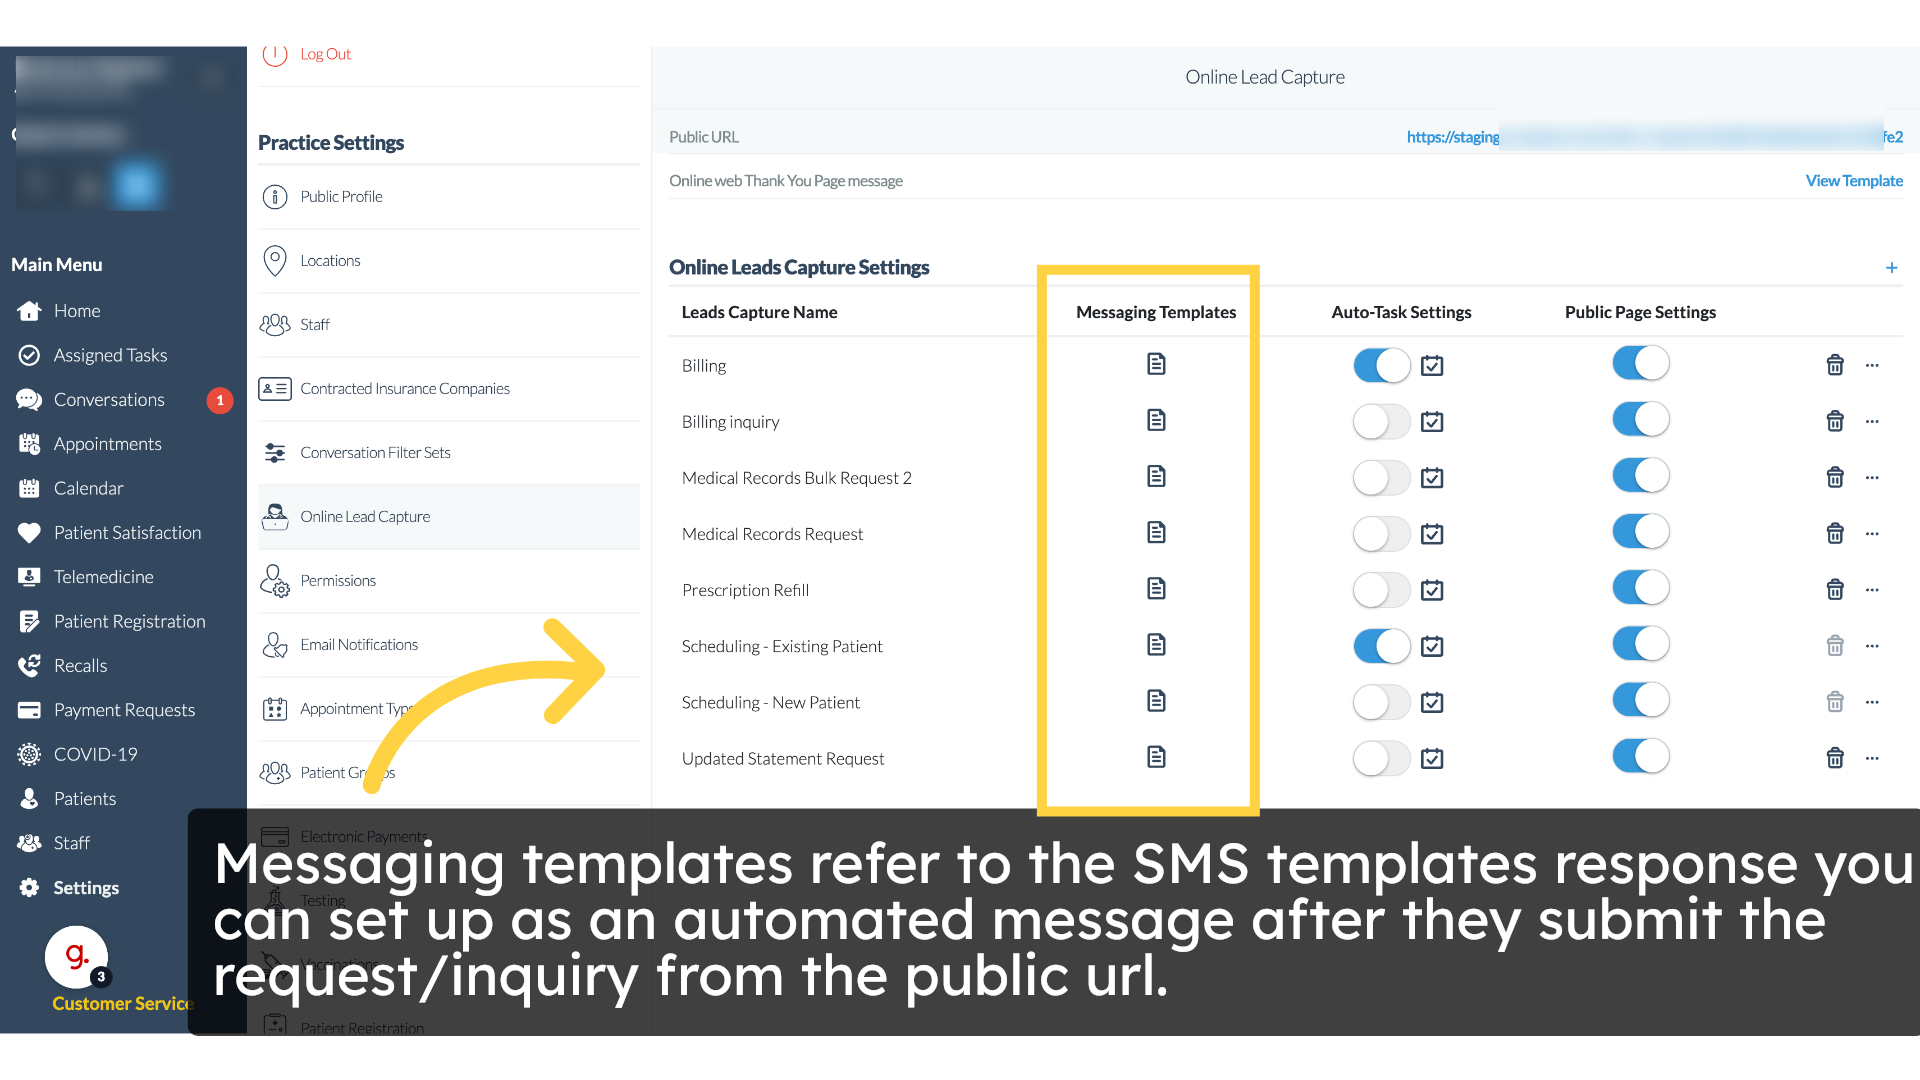
12. Setting Messaging Templates

Next, we have the messaging templates column. These are the SMS responses. You can set up to automatically send after patient submits their requests or inquiry from the public URL.

Click 'Public URL https://staging.curogram.com/online-requests/65ddf7edb22b3a04a1500fe2'

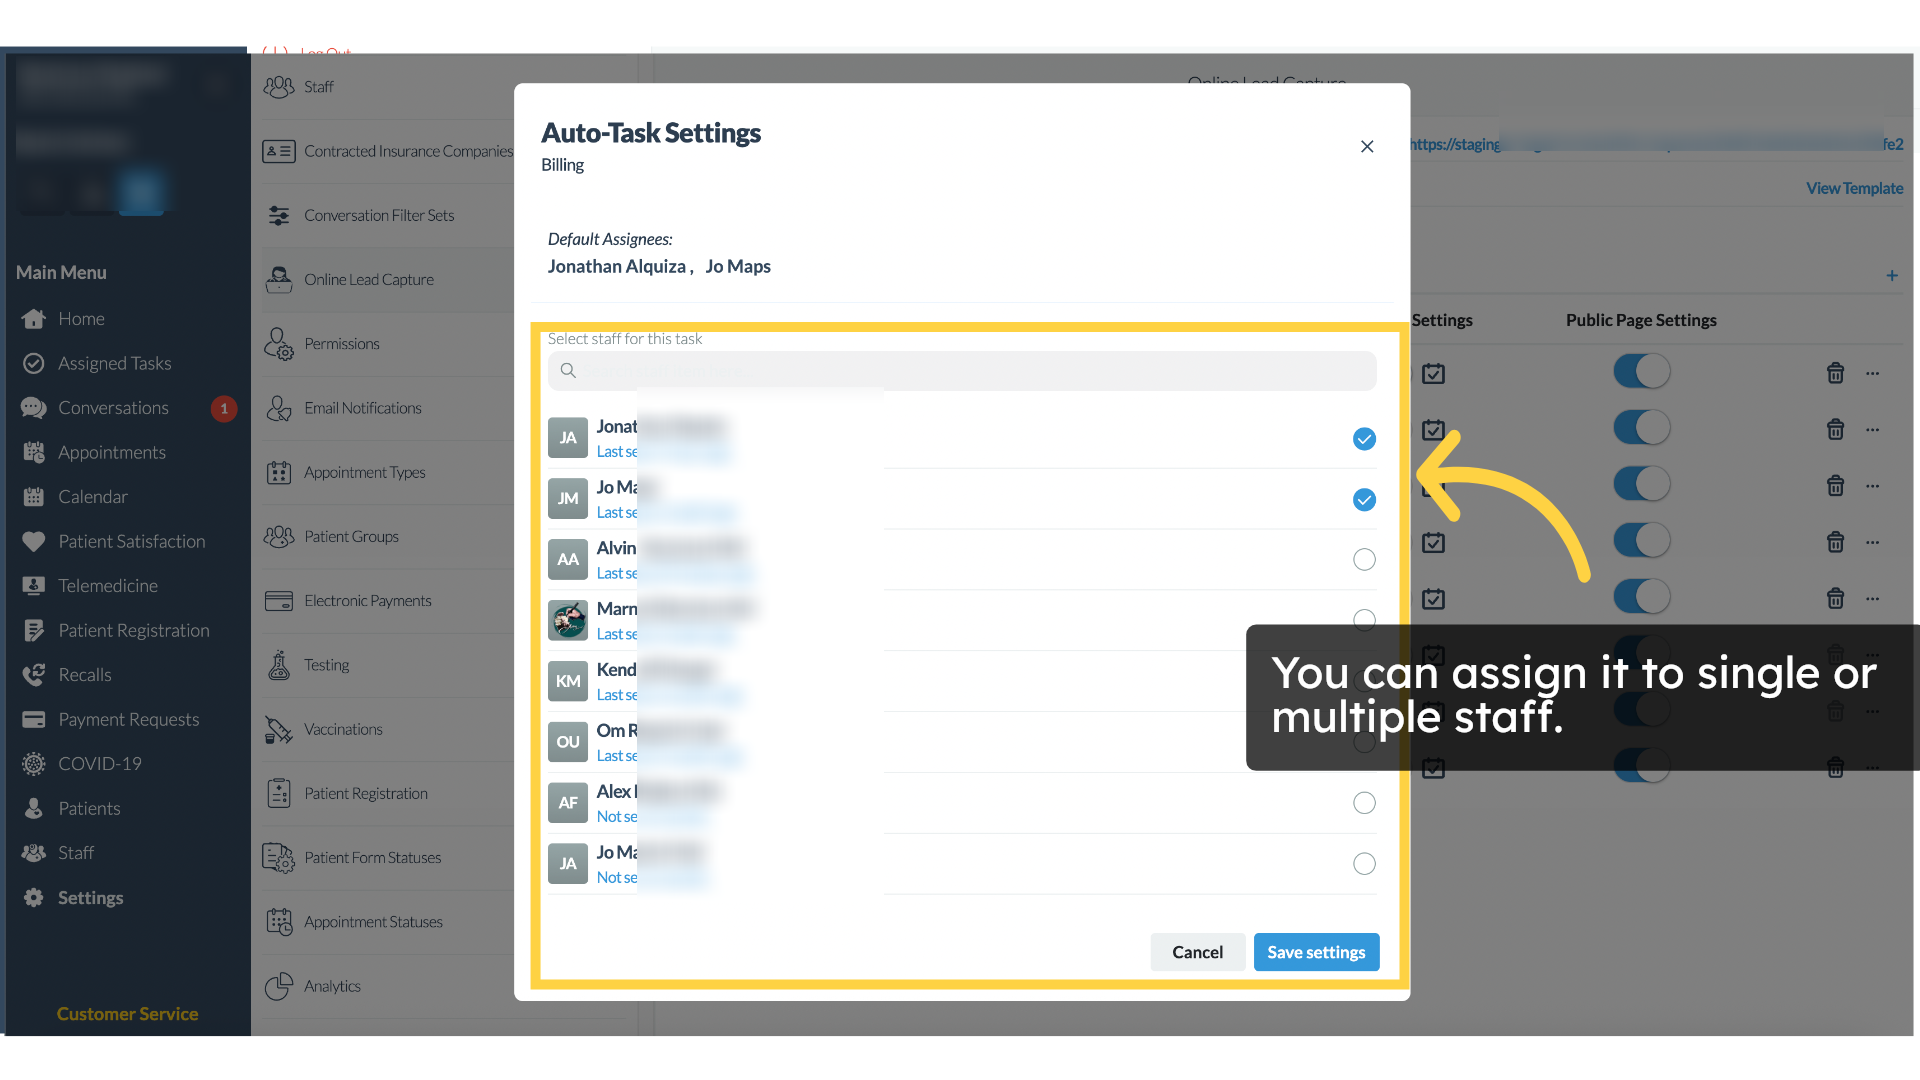
13. Configuring Auto Task Settings

Following that, autotask settings control whether incoming requests are automatically assigned as tasks when a patient submits a requests from the public URL.

Click 'Initial Response'

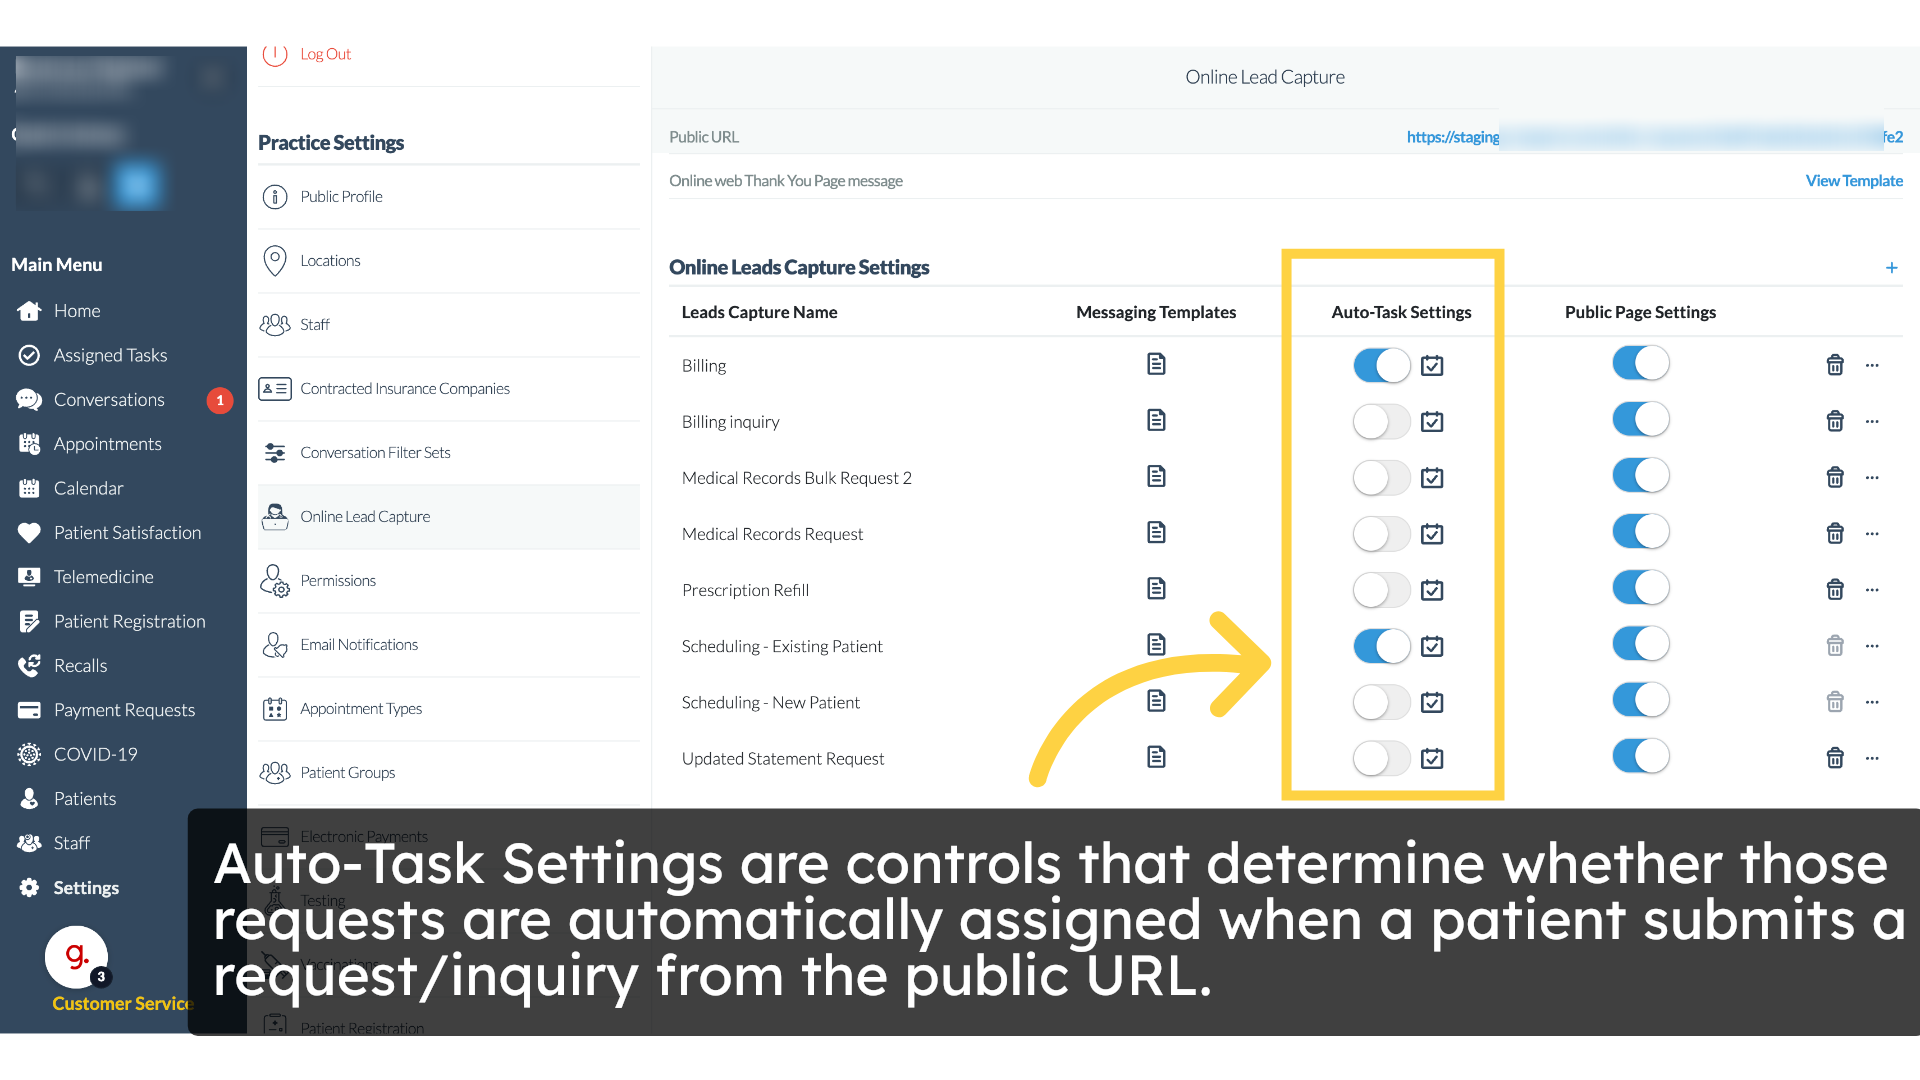
14. Opening Task Settings

The small icon beside the toggle opens, the task settings.

Click 'Public URL https://staging.curogram.com/online-requests/65ddf7edb22b3a04a1500fe2'

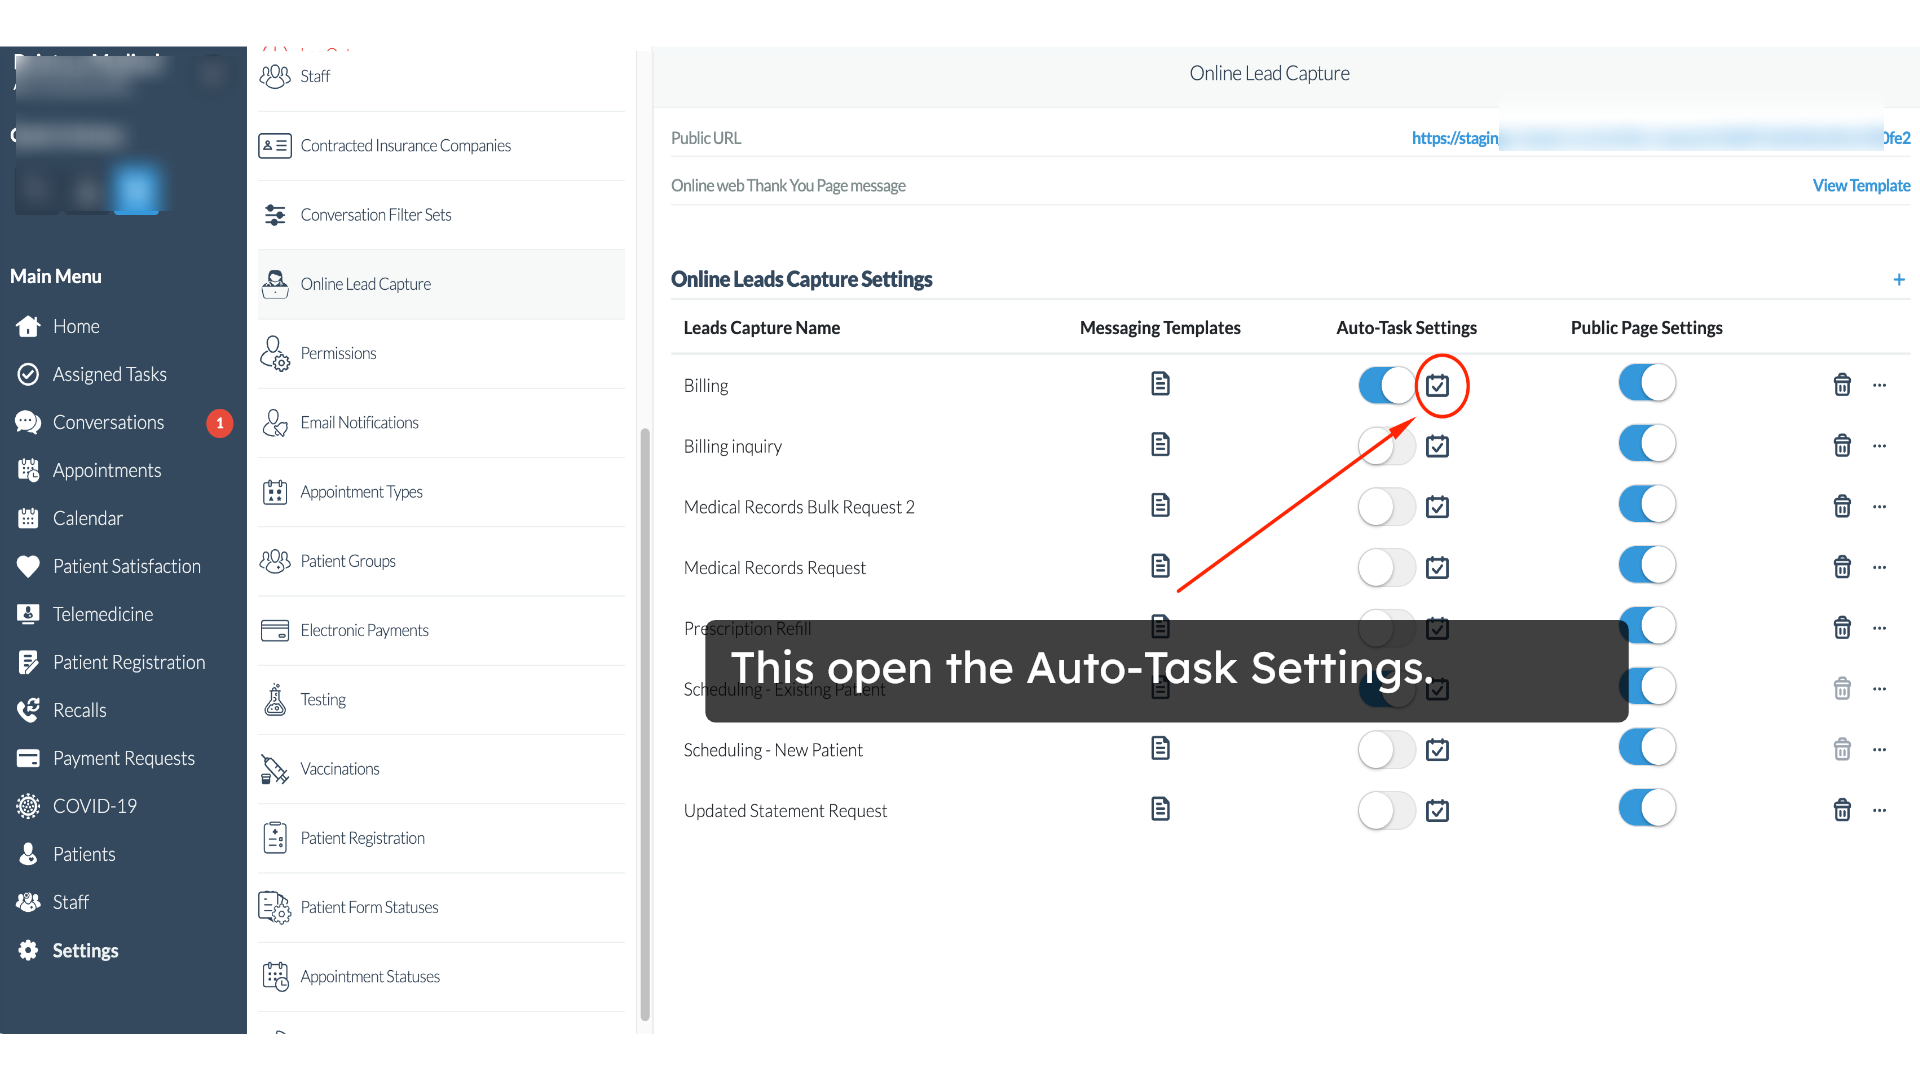
15. Assigning Tasks to Staff

This pop-up will appear once you toggle the auto task settings from here, you can assign those tasks to a single or multiple person once a patient submits a request.

Click 'Public URL https://staging.curogram.com/online-requests/65ddf7edb22b3a04a1500fe2'

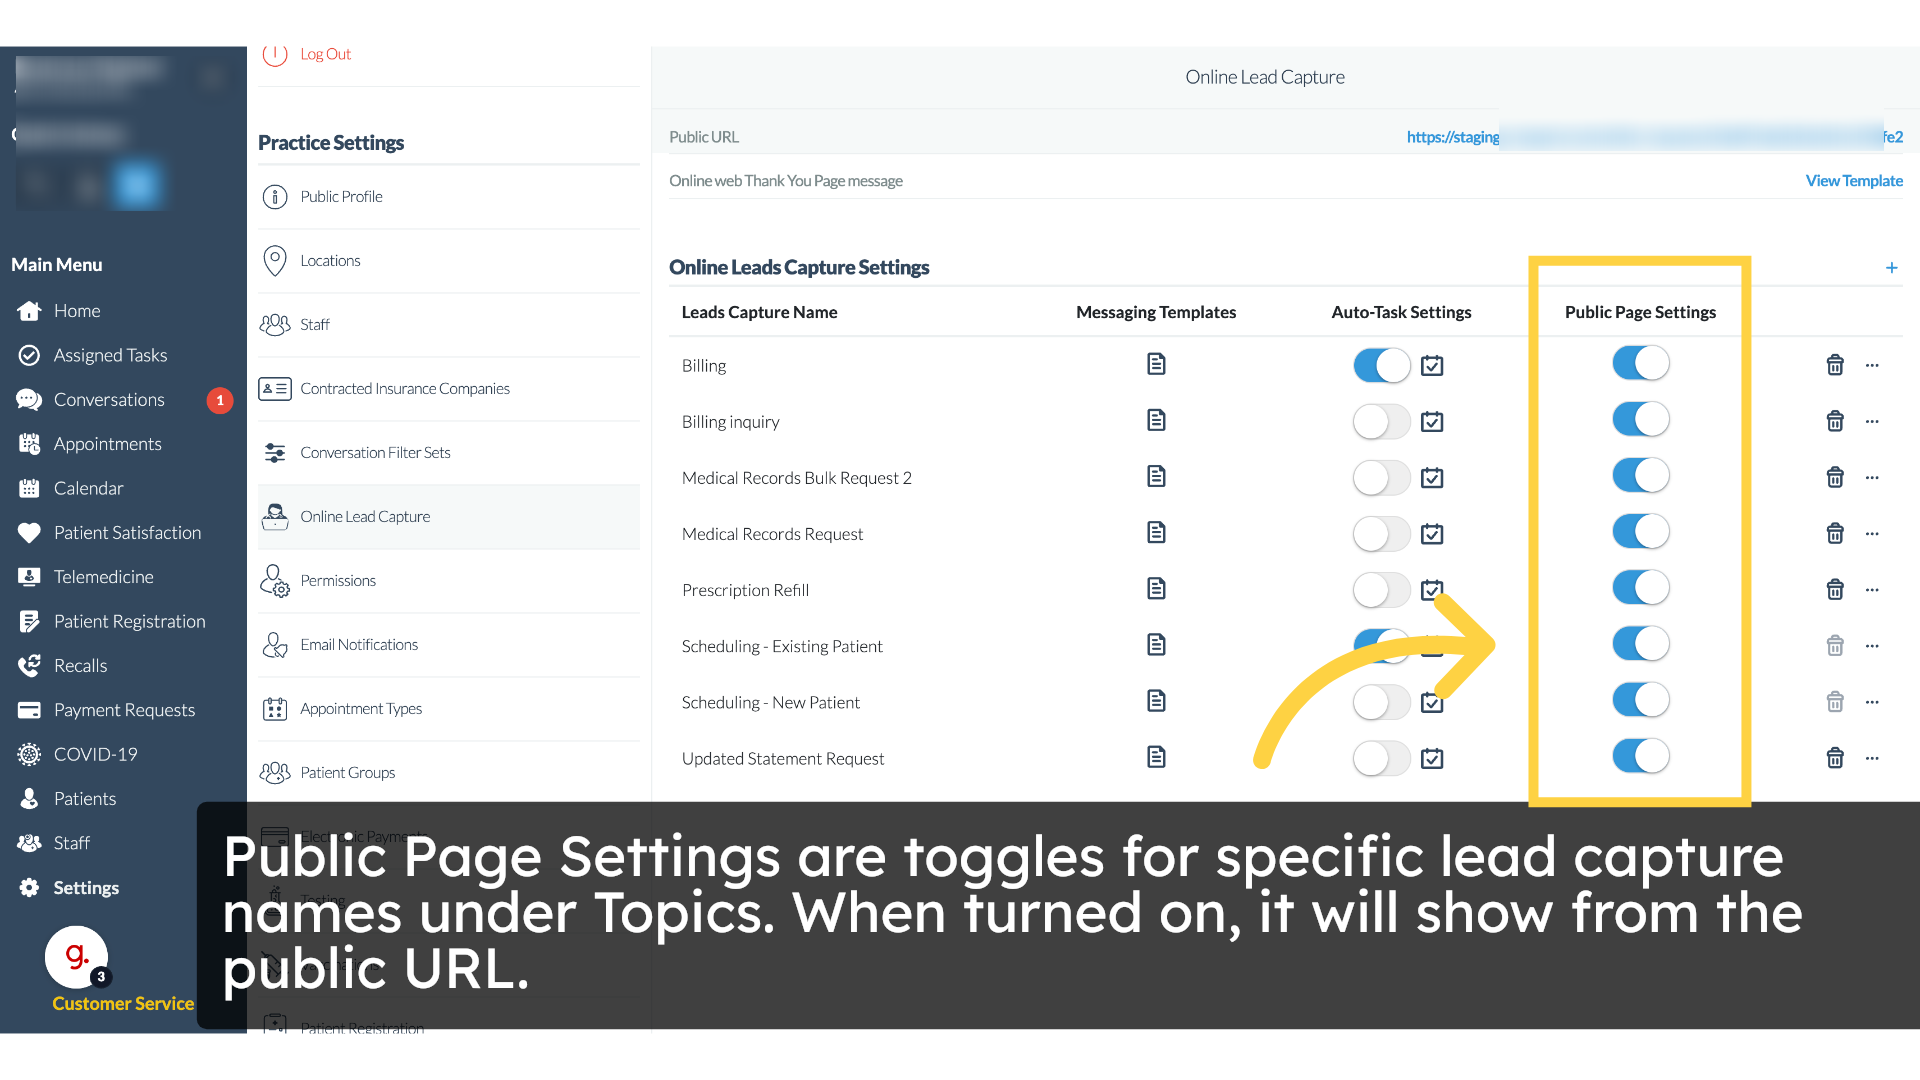
16. Managing Public Page Settings

Public page settings are toggle switches that control whether a specific lead capture name, such as billing prescription, refill, or scheduling new patient appears on the public-facing online, lead capture URL.

Click 'Public URL https://staging.curogram.com/online-requests/65ddf7edb22b3a04a1500fe2'

17. Editing or Deleting Lead Capture Names

Lastly, here you'll find the delete and edit buttons. Use these to remove or customize an existing lead capture name.

Click here

18. Creating a New Lead Capture Name

So, how exactly can you create a captured lead name? Let's walk through the steps.

Click 'Public URL https://staging.curogram.com/online-requests/65ddf7edb22b3a04a1500fe2'

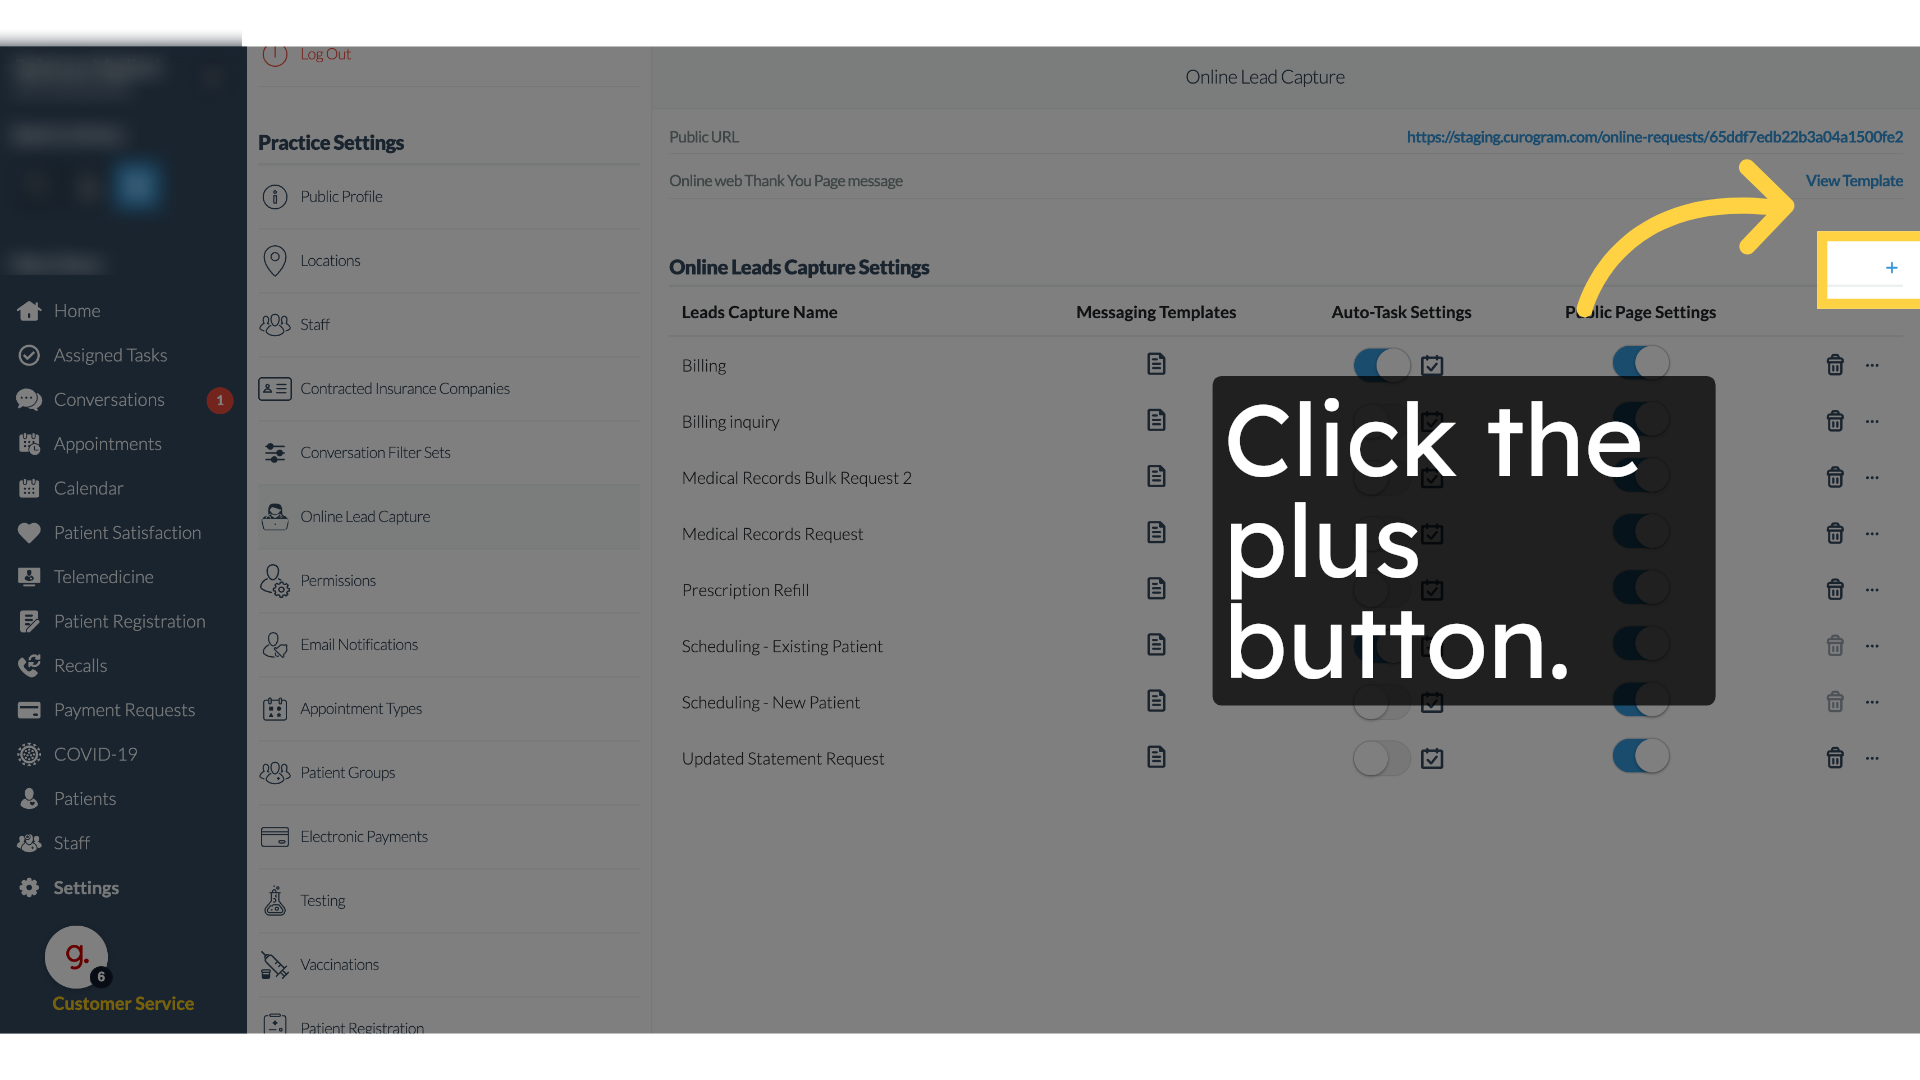
19. Adding a New Lead Capture Name

Next, click the plus plus symbol button in the top right corner to create a new lead capture name.

Click 'Public URL https://staging.curogram.com/online-requests/65ddf7edb22b3a04a1500fe2'


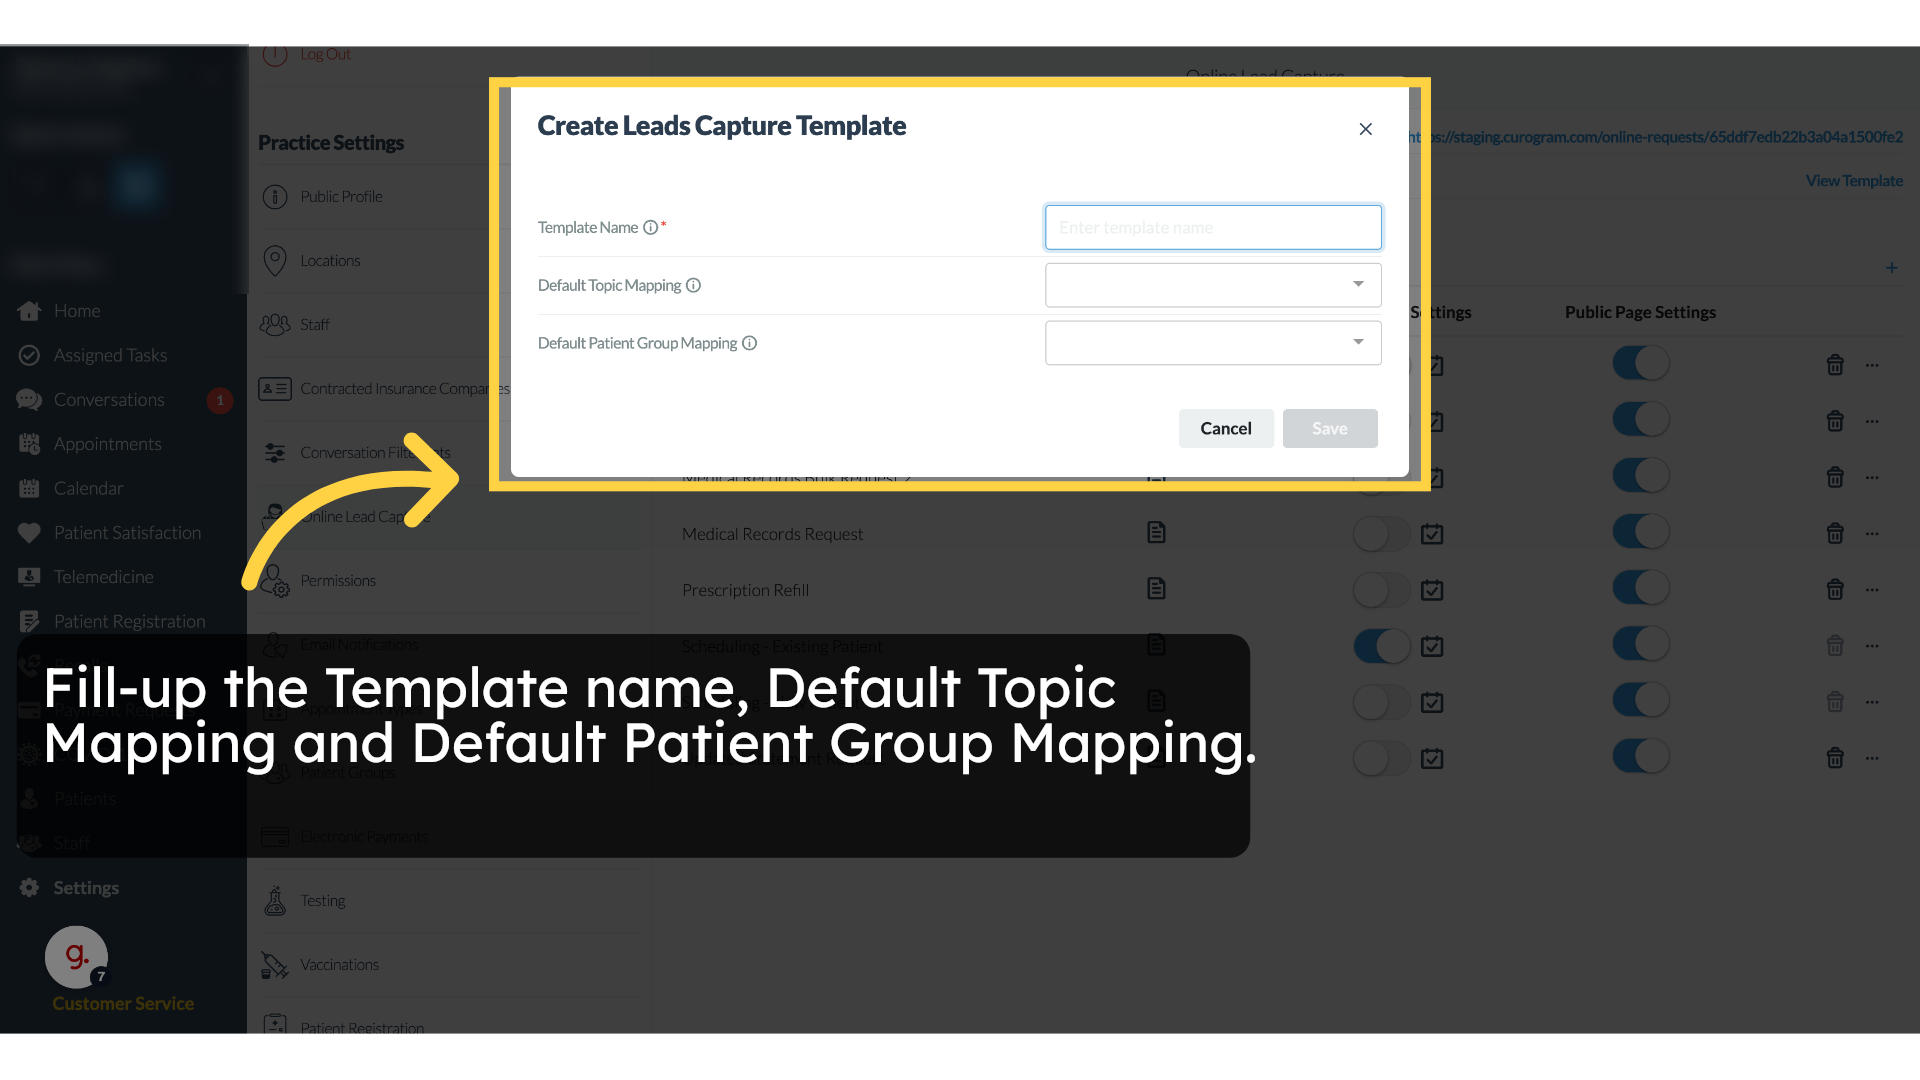
20. Entering Template Details

Enter the template name then select the default topic mapping and default Patient Group mapping.

Click 'Cancel  Save'

21. Patient’s View of the Online Lead Capture Form

Next, I'll show you the public URL from the patient's point of view.

Click 'Public URL https://staging.curogram.com/online-requests/65ddf7edb22b3a04a1500fe2'


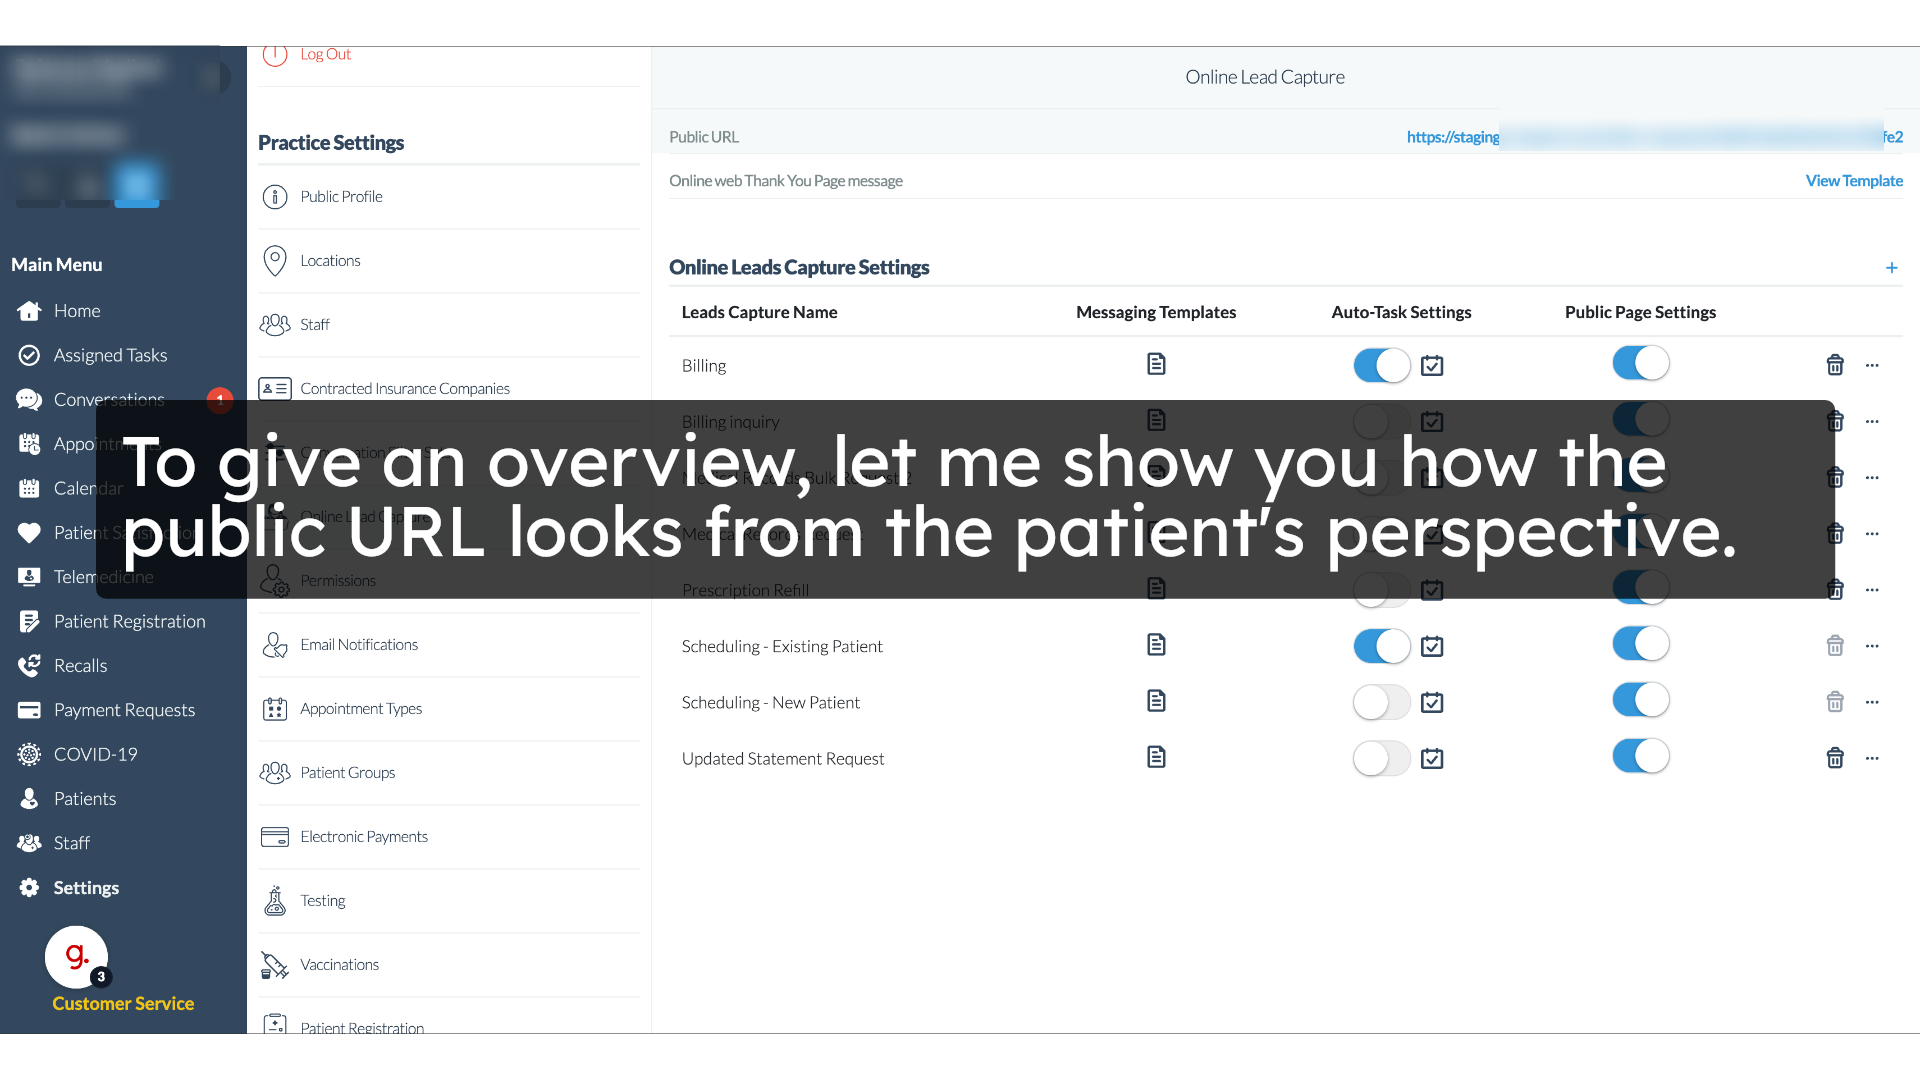
22. Patient's Perspective

This is what patients will see when they access your public URL for online lead capture.


Click 'Public URL https://staging.curogram.com/online-requests/65ddf7edb22b3a04a1500fe2'


23. Patient Selecting a Topic

From here, the patient can select a topic such as billing or prescription refills that comes directly from the online lead capture options you've created and set in your online lead capture dashboard.

Click 'Public URL https://staging.curogram.com/online-requests/65ddf7edb22b3a04a1500fe2' 

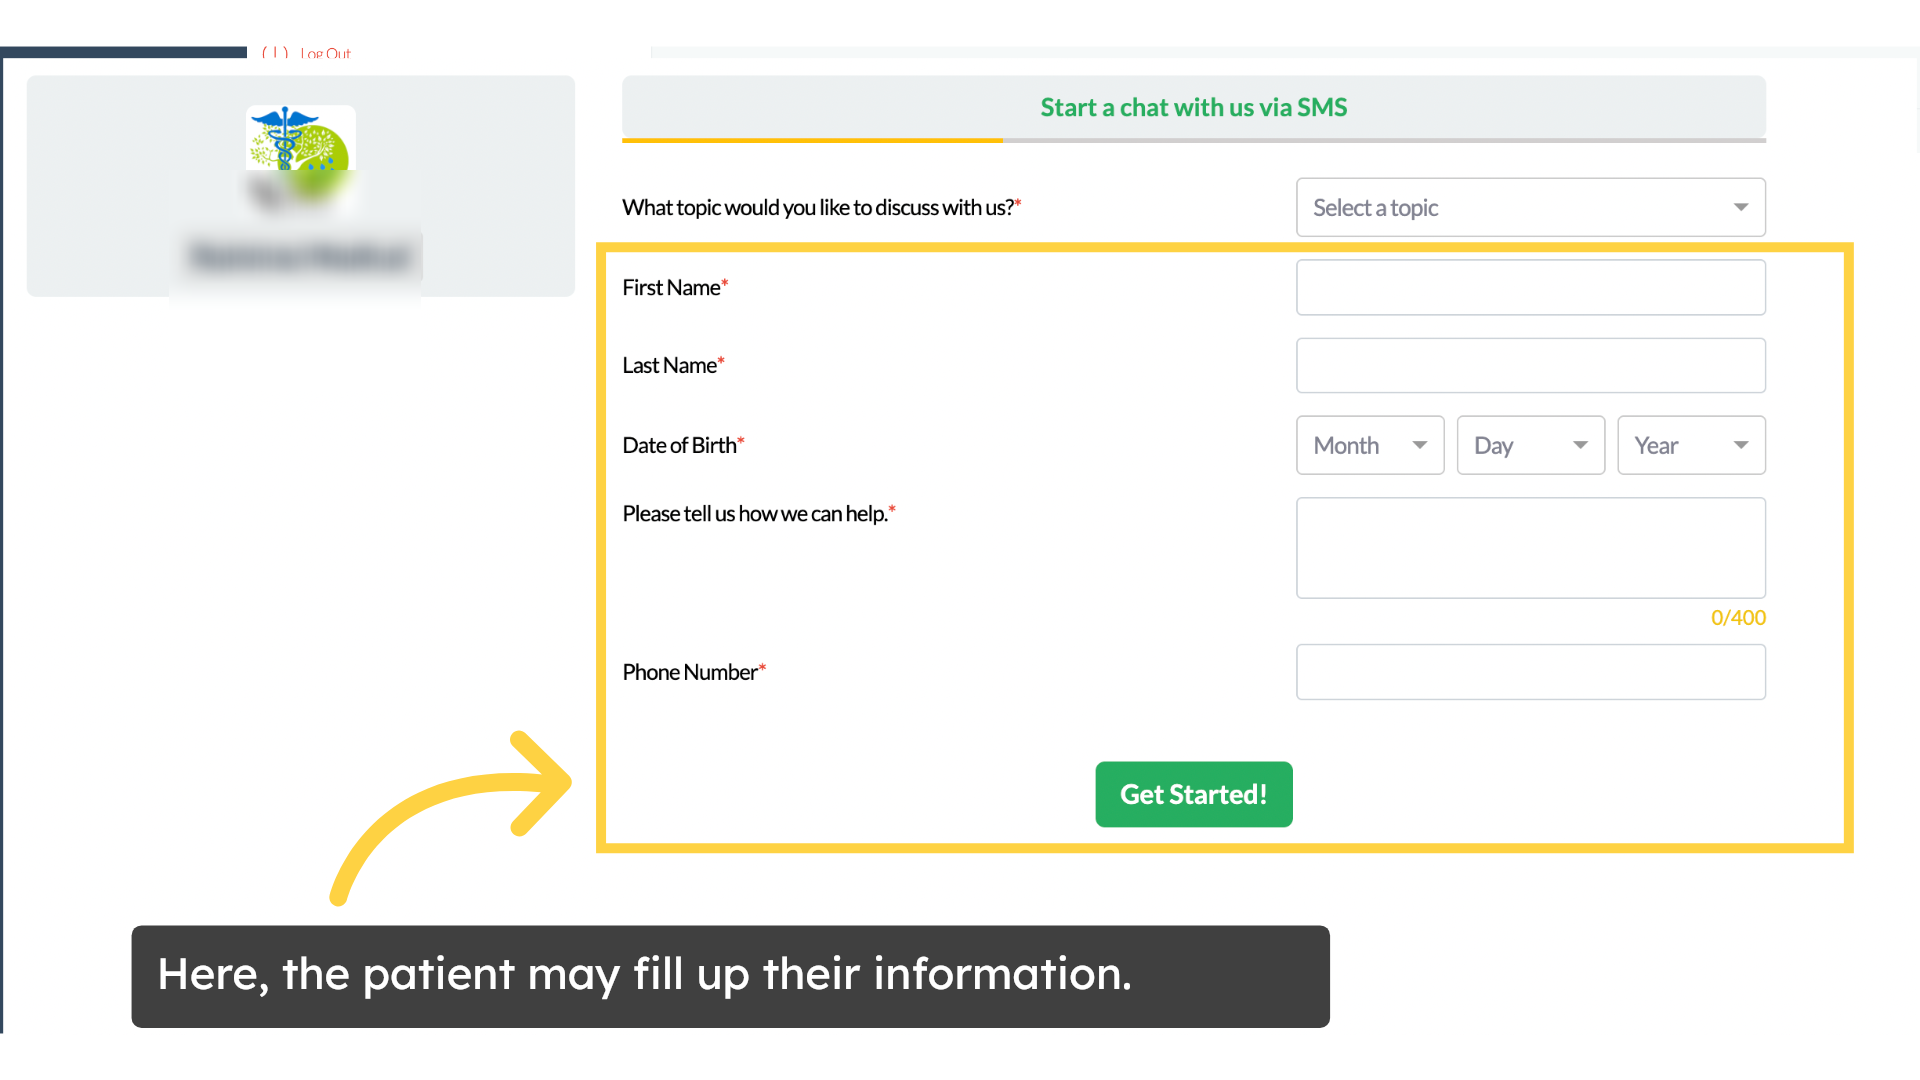
24. Patient Entering Information

Here, the patient can enter their information including name, date of birth, phone number and a brief description of their request.

Click 'Public URL https://staging.curogram.com/online-requests/65ddf7edb22b3a04a1500fe2'
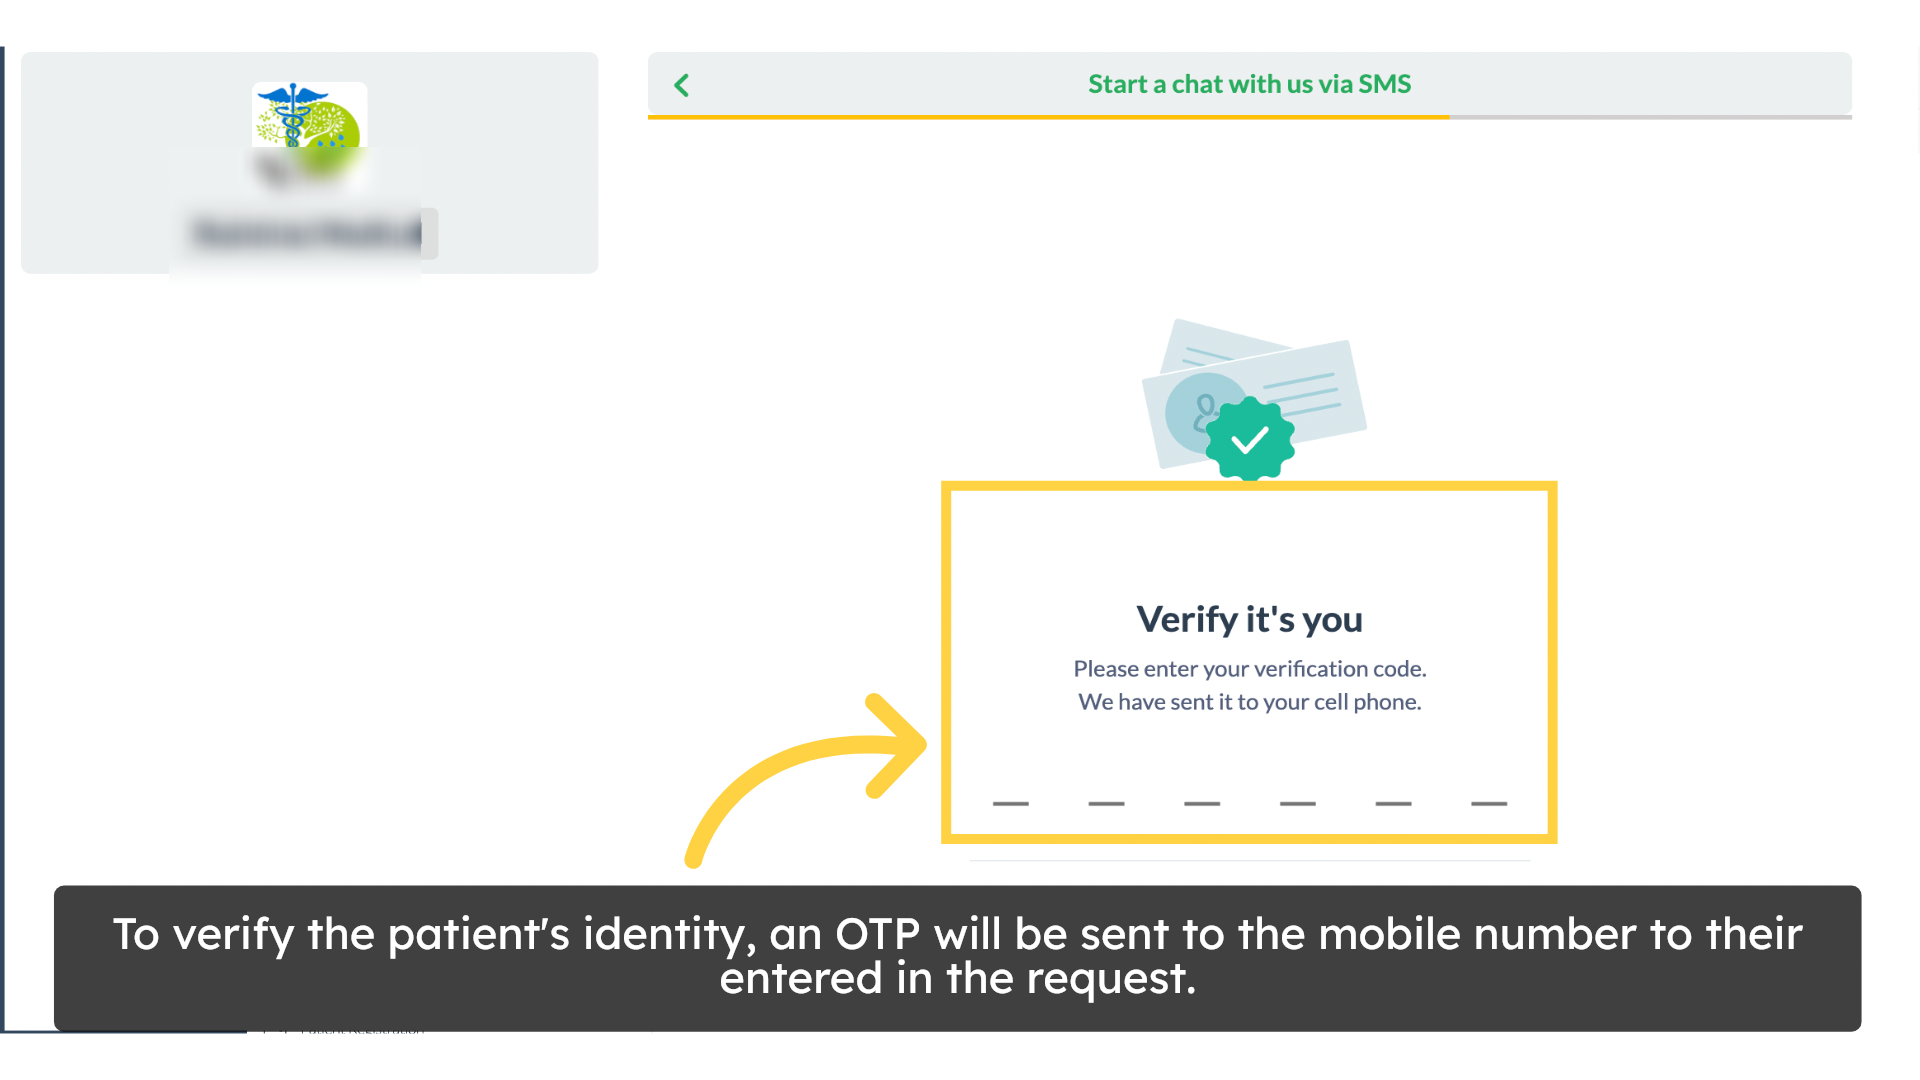
25. Submitting a Request with OTP Verification

To verify identity, an OTP will be sent to the mobile number entered in the form by the patient. Once the code is entered, the request is successfully submitted.
Click 'Public URL https://staging.curogram.com/online-requests/65ddf7edb22b3a04a1500fe2'That's it, you've successfully learned how online lead capture works, and explored all its features. If you have any questions contact us at support@curogram.com. We're always happy to help.