
What is Curogram Payments?
Curogram Payments is a built-in payment gateway, powered by XplorPay, that allows your practice to securely collect patient payments directly through Curogram. It works similarly to other gateways (such as EasyPay or Stripe), but is seamlessly integrated into your existing Curogram workflow.
With Curogram Payments, your practice can:
-
Send payment requests
-
Add charges
-
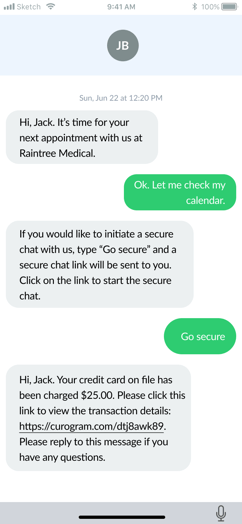
Send payment links to patients
-
Allow patients to pay by entering their credit card details
-
Void and refund payments
-
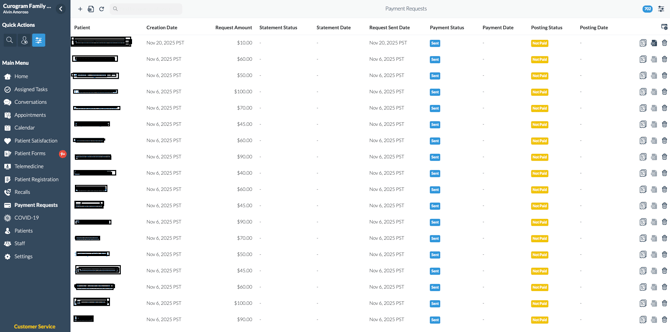
View all payment activity in your Payment Requests dashboard
Curogram Payments, powered by XplorPay, is a validated payment processor that securely handles card transactions and complies with PCI DSS security standards.
What Makes Curogram Payments Different?
Curogram Payments introduces several features designed to make collecting payments easier and faster:
- Faster setup and activation
Practices can complete onboarding quickly and begin collecting payments without waiting for external configuration or API credentials. - Save credit cards on file (with patient consent)
Patients can securely save a card on file during a payment. Saved cards make future transactions faster and reduce the need to send payment links for every charge. - Pre-authorization charges
If a patient has a card saved on file, the practice can complete approved charges without requiring the patient to re-enter payment details. - Payment plans (coming soon)
With saved cards and pre-authorization support, Curogram Payments will soon support payment plans to help patients settle balances through installments. - Reconciliation visibility
Curogram Payments provides improved accuracy when tracking which payments have been completed and deposited to the practice.
Core Components of Curogram Payments
Curogram Payments includes the following key components:
1. Onboarding
A guided onboarding flow inside Curogram that allows your practice to register as a merchant and begin processing payments.
2. Curogram Payments Public Widget
This is the payment screen patients see when they open your payment link.
It supports:
-
Using a saved credit card
-
Entering a new card
-
Giving consent to save a card for future use
3. Credit Card on File
A section inside the patient profile that shows:
-
Saved credit cards
-
The default card
-
Options for charging or removing cards (with patient consent)
Curogram Payments Onboarding
The onboarding process is simple and takes place entirely inside Curogram.
Step 1: Start the Onboarding Form
Your practice initiates the Curogram Payments application from the Electronic Payments settings page.
Step 2: Complete the Application
- You will be guided through a secure online merchant application powered by Xplor Pay.
The application includes: -
Practice information
-
Banking information (for deposits)
-
Owner or authorized signer details
At the end of the application, you will review and sign electronically.
Step 3: Begin Using Curogram Payments
- Once approved, Curogram Payments becomes available as your payment gateway.
You can then begin sending payment requests and accepting payments immediately.
ONBOARDING VIDEO:
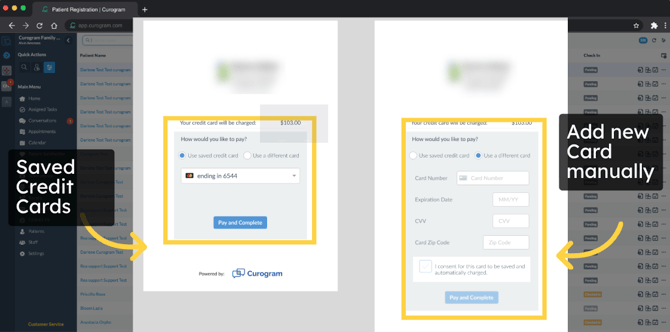
Curogram Payments Public Widget (What Patients See)
When a payment request is sent, the patient receives a secure link. After verifying their identity, the patient sees a page displaying:
-
The list of charges
-
A Pay button
-
The Curogram Payments widget
The widget includes two options:
1. Use saved credit card
If the patient has previously saved a card:
-
A dropdown displays all saved cards
-
The patient can choose a card and complete the payment instantly
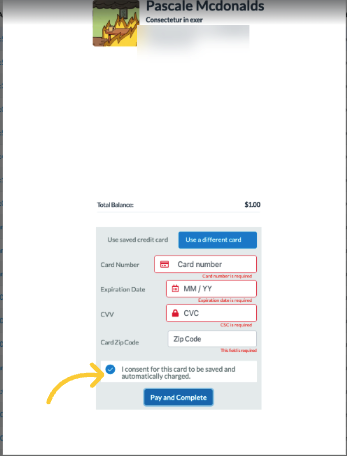
2. Use a different card
The patient can enter a new credit card by filling in:
-
Card number
-
Expiration date
-
CVV
-
Zip code
These fields are required for completing a payment.
Optional Consent to Save Card
Below the payment fields, an optional checkbox allows the patient to save their card:
“I consent for this card to be saved and automatically charged.”
If selected:
-
The card is tokenized (securely encrypted)
-
Added to the patient’s list of saved cards in Curogram
After the patient clicks Pay and Complete, the system processes the payment and displays the Receipt Page.
Saved Credit Cards on File
When a patient saves a card, Curogram stores only a secure token—not the actual card number—via Xplor Pay.
Saved cards appear in the Credit Cards tab of the:
-
Patient Info page
-
Patient Details modal
What practices can do with saved cards
-
Set a card as the default
-
Charge the card manually (with patient consent already on file)
-
Delete a saved card
Deleting the last card on file will remove the ability to process manual charges until a new card is saved by the patient.
Credit Cards on File Video:
Manual Charges
Manual Charges allow your practice to charge a patient’s saved card directly—without sending a payment link—when appropriate consent has been given.
How to Make a Manual Charge
-
Open the patient’s file

-
Go to the Credit Cards tab
-
Locate the card and click Manual Charge
-
Enter charge descriptions and amounts.

-
Click Process Charge
After processing:
-
A record is added to the Payments dashboard.
-
The patient receives a receipt notification.
If you do not see this feature enabled or need further information, contact our support team at support@curogram.com.
We are always happy to help.
Learn more about